
Manage Users and User Groups
Users, Groups, Resources, and Roles
IREX users are structured by user groups. All members of a group have the same access rights to a kind of system resource — cameras and extra resources (database lists, locations, etc). The same user may belong to multiple groups.
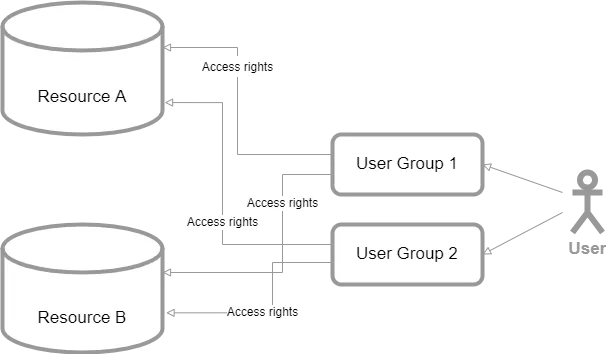
However, users within a group may differ by their roles — named collections of accessible system functionalities.
Roles Versus Permissions Matrix
A user can only be added to a group with a role assigned. A role is a named collection of available functionalities, described in full detail in the matrix below. Each column is a role; a mark in a cell means that role includes the permission.
| Resource | Permission | Viewer | Member | Operator | Group Manager | Camera Manager | System Manager |
|---|---|---|---|---|---|---|---|
| User Groups | View the group tree and group details | Yes | Yes | Yes | Yes | Yes | Yes |
| View users in a group | No | No | No | Yes | Yes | Yes | |
| Create, edit, and delete groups (the root group cannot be deleted) | No | No | No | Yes | No | Yes | |
| Assign and unassign map marks, person lists, vehicle lists, and alarm monitors | No | No | Yes | Yes | Yes | Yes | |
| Assign and unassign resource groups | No | No | Yes | Yes | No | Yes | |
| Assign and unassign cameras, buildings, plans, and external devices | No | No | No | Yes | Yes | Yes | |
| Assign and unassign subgroups | No | No | No | Yes | No | No | |
| Users | View own profile | Yes | Yes | Yes | Yes | Yes | Yes |
| View the user list | No | No | No | Yes | Yes | Yes | |
| Create, edit, and delete Group Manager, Operator, Member, and Viewer accounts (a user cannot delete their own account) | No | No | No | Yes | Yes | Yes | |
| Create, edit, and delete Camera Manager and System Manager accounts (a user cannot delete their own account) | No | No | No | No | Yes | Yes | |
| Activate and deactivate Group Manager, Operator, Member, and Viewer accounts (a user cannot change their own account status) | No | No | No | Yes | No | Yes | |
| Activate and deactivate Camera Manager and System Manager accounts (a user cannot change their own account status) | No | No | No | No | No | Yes | |
| Resource Groups | View the list, group details, and the resources in a group | Yes | Yes | Yes | Yes | Yes | Yes |
| Create, edit, and delete resource groups (only an empty group can be deleted) | No | No | No | Yes | Yes | Yes | |
| Cameras | View the camera list, analytics settings, live and recorded video, and analytics events, and download video | Yes | Yes | Yes | Yes | Yes | Yes |
| Control PTZ | No | Yes | Yes | Yes | Yes | Yes | |
| Create, edit, turn on, turn off, and delete cameras | No | No | No | No | Yes | Yes | |
| Manage camera tags | No | No | No | No | Yes | Yes | |
| Set up video analytics and detectors | No | No | No | No | Yes | Yes | |
| Manage event names for video analytics rules | No | No | No | No | Yes | Yes | |
| Alarm Monitors | View the list and the events in a monitor | Yes | Yes | Yes | Yes | Yes | Yes |
| Turn on, turn off, create, edit, and delete alarm monitors | No | Yes | Yes | Yes | Yes | Yes | |
| Enable messenger notifications | No | Yes | Yes | Yes | Yes | Yes | |
| Layouts | View the layout list, play live video, create, edit, and delete layouts, and add or remove cameras | Yes | Yes | Yes | Yes | Yes | Yes |
| Person and Vehicle Lists | View lists and the records in them | Yes | Yes | Yes | Yes | Yes | Yes |
| Create, edit, and delete lists and the records in them | No | Yes | Yes | Yes | Yes | Yes | |
| Buildings and Plans | View buildings, plans, and the devices on a plan | Yes | Yes | Yes | Yes | Yes | Yes |
| Create, edit, and delete buildings and plans, and add or remove devices | No | No | No | Yes | Yes | Yes | |
| Map Marks and Mark Types | View marks and mark types | Yes | Yes | Yes | Yes | Yes | Yes |
| Create, edit, and delete marks and mark types | No | No | Yes | Yes | Yes | Yes | |
| ONVIF Devices | View, create, edit, and delete devices, and add cameras | No | No | No | No | Yes | Yes |
| Road Objects | View road objects and traffic violations | Yes | Yes | Yes | Yes | Yes | Yes |
| Create, edit, and delete road objects, bind cameras, and set up violation rules | No | No | No | Yes | Yes | Yes | |
| Violation Names | View | Yes | Yes | Yes | Yes | Yes | Yes |
| Create, edit, and delete violation names | No | No | No | No | Yes | Yes | |
| Plate Number Templates | View, create, edit, and delete plate number templates | No | No | No | Yes | Yes | Yes |
| Technical Allowance DB | View | No | No | No | No | Yes | Yes |
| Vehicle Insurance DB | View | No | No | No | No | Yes | Yes |
| Traffic Violation Export | View, create, edit, and delete export tasks | No | No | No | No | Yes | Yes |
| Personal Settings | Edit own profile, language, and theme | Yes | Yes | Yes | Yes | Yes | Yes |
| Settings | View license information | No | No | No | No | Yes | Yes |
| Set up branding, localization, the license, and system notifications | No | No | No | No | No | Yes | |
| Logbook | View log entries for users in the signed-in user's groups and in child groups | No | No | No | Yes | Yes | Yes |
| View log entries for every user | No | No | No | No | No | Yes | |
| Create and download a report from a logbook search (only reports that the same user started) | No | No | No | Yes | Yes | Yes |
Manage System Users
View Existing User List
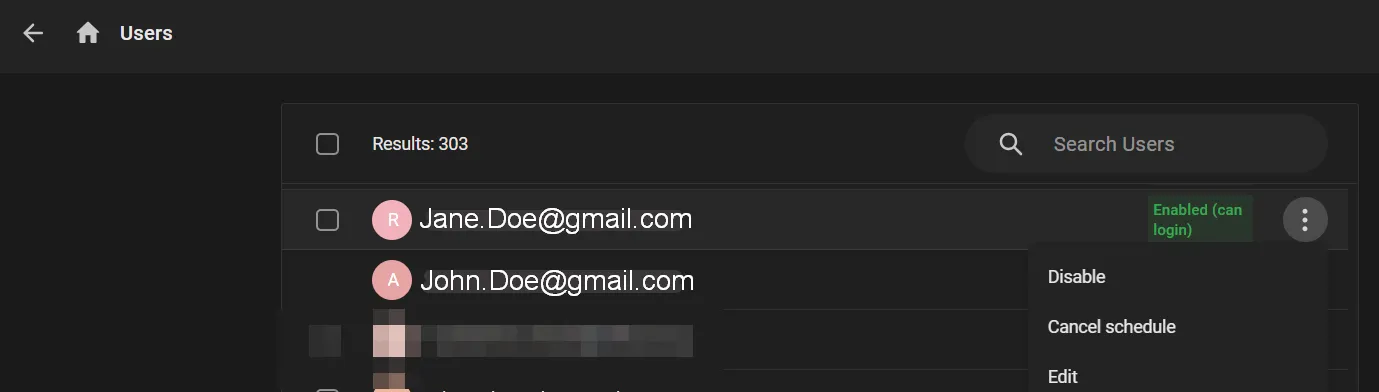
Select the User Menu > Users to view a consolidated list of all existing Platform users at the organization, no matter what user groups they belong to.
Adding a New System User
New system users can only be added to a group, after which they appear on the consolidated list too.
Edit User's Details
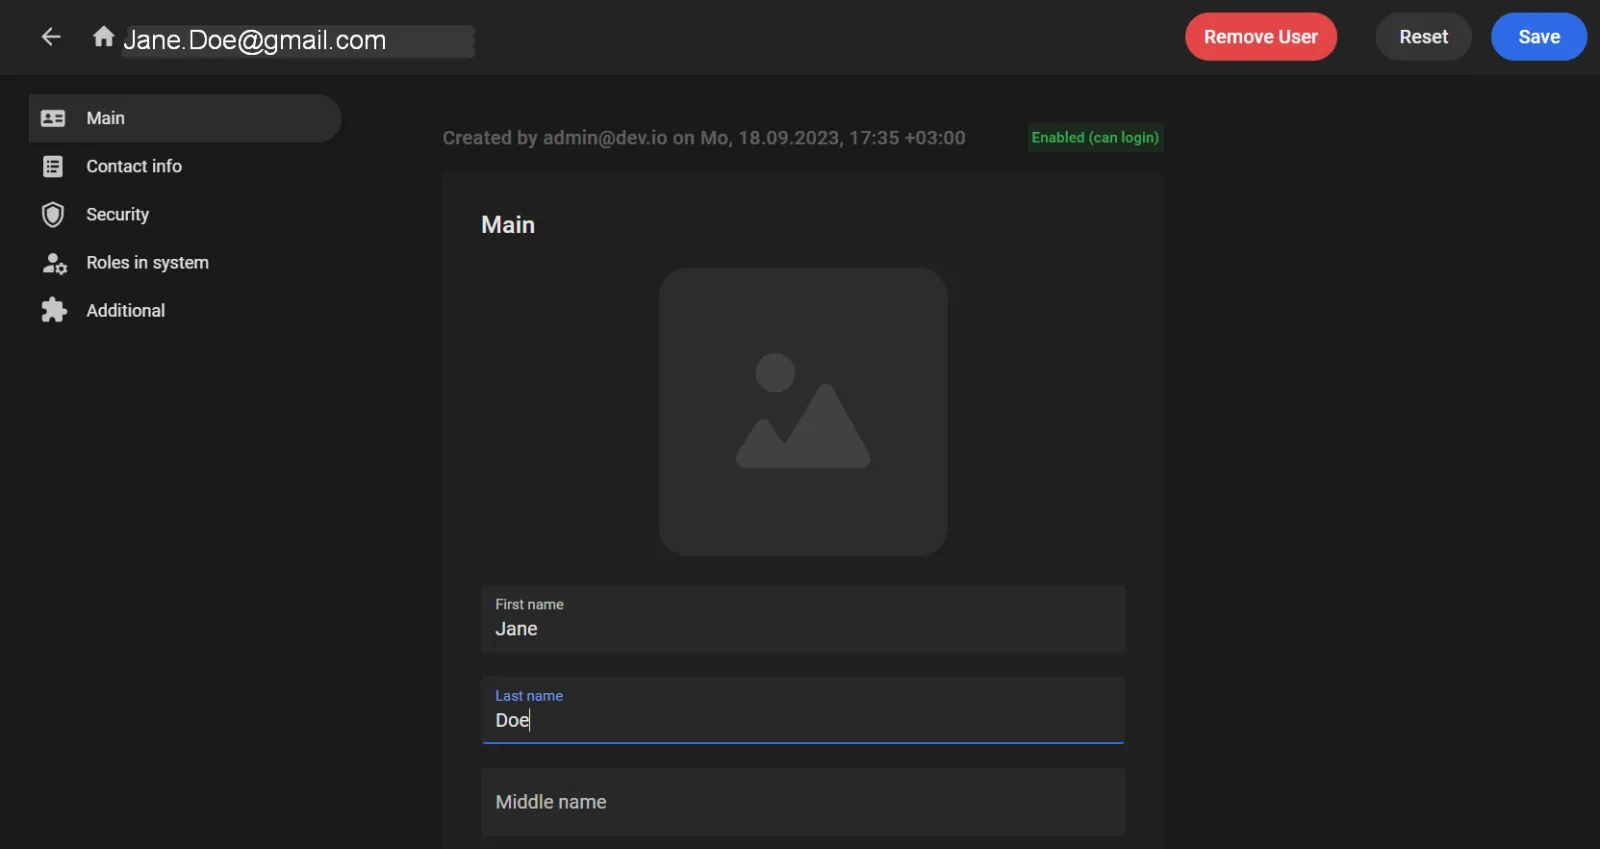
To enter/ edit details of a user, click Edit in the three-dot menu as shown above, then complete/ edit the user's details form that opens.
Manage User Access
The Admin can temporarily deny login of a user (make him or her “disabled” in terms of this manual). The current user's status is shown on the consolidated list as “Enabled” or “Disabled”. To do so:
- Click Disable in the three-dot menu.
- In the window that opens ...
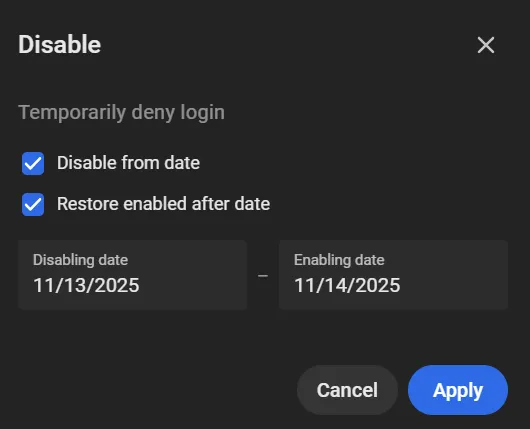
... do:
Click Apply to disable the user right away. The user can be re-enabled later this way.
Checkmark Disable from date and enter the disabling date to schedule the disabling, then click Apply.
Checkmark Restore enabled after date and enter the restore date to automatically make the user re-enabled after this date, then click Apply.
To re-enable a disabled user:
- Click Enable in the three-dot menu.
- In the window that opens ...
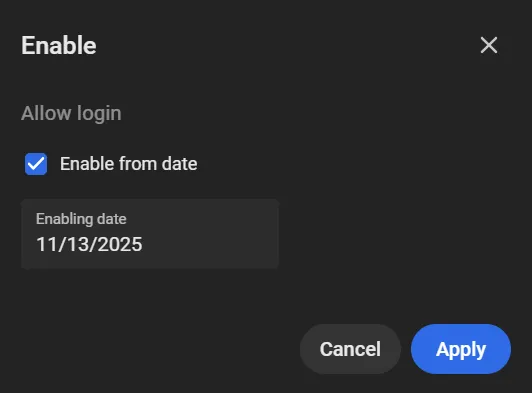
... do:
Click Apply to enable the user right away.
Checkmark Enable from date and enter the enabling date to schedule the enabling, then click Apply.
Cancel Scheduled Enabling/ Disabling
To cancel scheduled enabling/ disabling of a user, click Cancel schedule in the three-dot menu, then confirm the operation.
Manage User Groups
Select User Menu > User Groups. The User Groups page opens and shows the full hierarchy of groups in the system.
The options menu for a user group includes these actions:
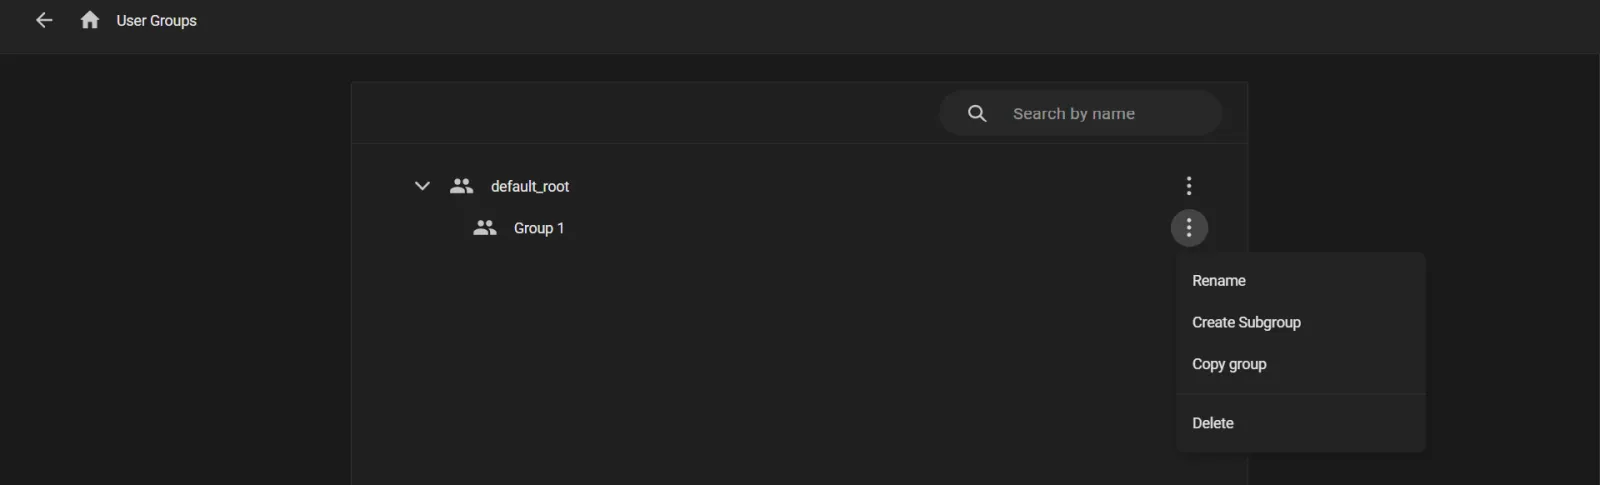
- Rename: In the window that opens, enter the new group name, and then select Save.
- Create Subgroup: In the window that opens, enter a name for the subgroup, and then select Create.
-
Copy group: Copies the selected group into another group that already exists. The copy includes the group’s subgroups, users, and resource access. This option is not available for default_root.
In the Copy group window, in Parent user group, select the destination group. Any group can be selected except the source group and its subgroups. Then select Copy.
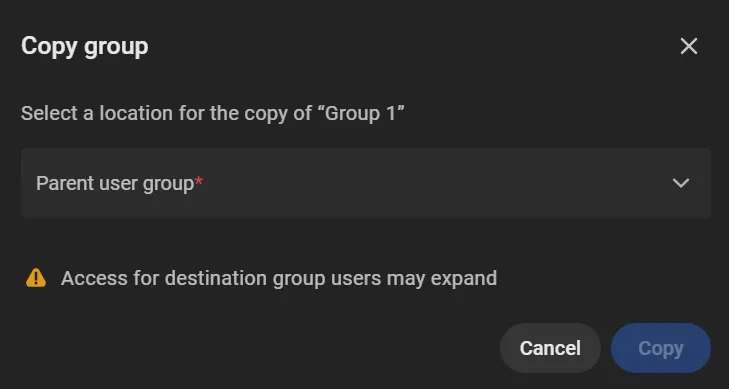
The copied group keeps the source group’s name and adds a number in parentheses, (1). If the parent group already has a group with that name and (1), the copy is numbered (2), and so on. Subgroups keep their names.
After the group is copied, users in the destination group have access to the resources and users of the copied group and its subgroups.
-
Delete: Removes the selected group. These restrictions apply:
- Any group except the root group can be deleted if the user has the required permissions.
- A group that contains subgroups can be deleted only from the bottom up. Delete the subgroups first.
- A group that has been granted access to resources cannot be deleted. Remove that access first.
Manage Members of a Group
Click as shown to open the <Group_name> screen.
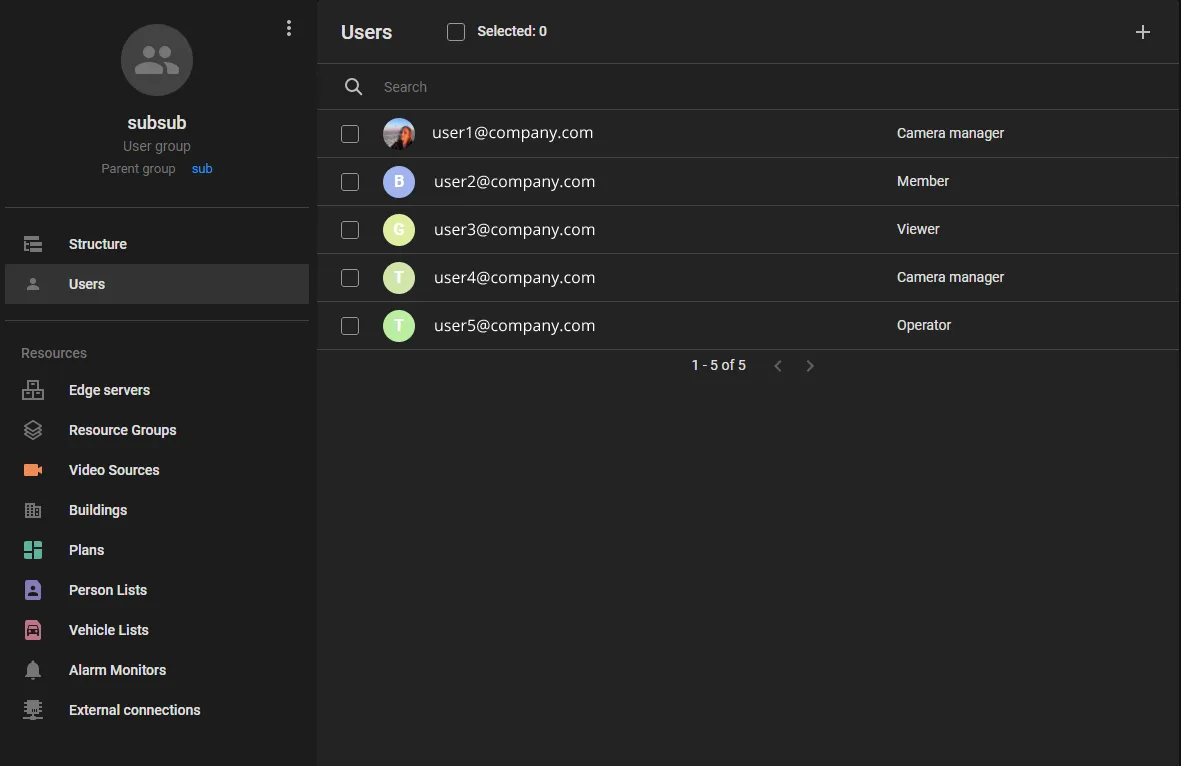
Add a Member to a Group
To add an already existing system user to a group that he or she is not a member of yet:
- Click the “+” in the top-right corner of the screen to open the Add Users to the User Group form holding the consolidated list of IREX users that do not belong to the group yet.
- Find the user to add to the list and checkmark. If the list is too long, use the search by name/email tool.
- Repeat step 2 to add as many new members as needed.
- Select a role, the same for all the new members, on the list at the right.
- Click Add in the bottom-right corner.
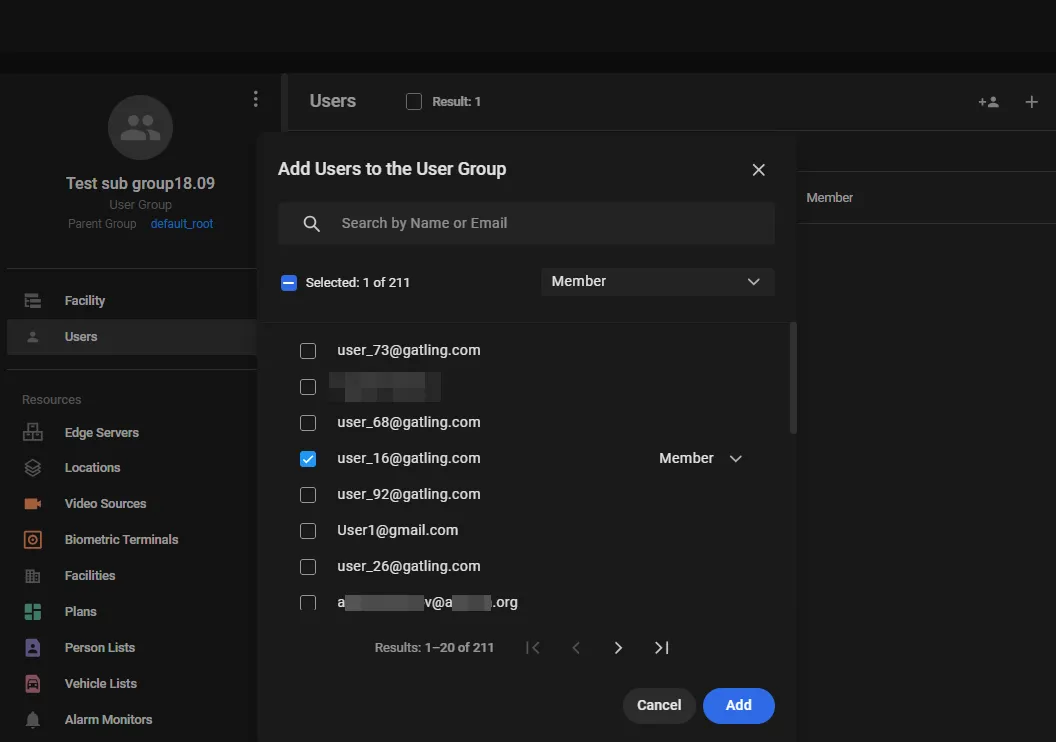
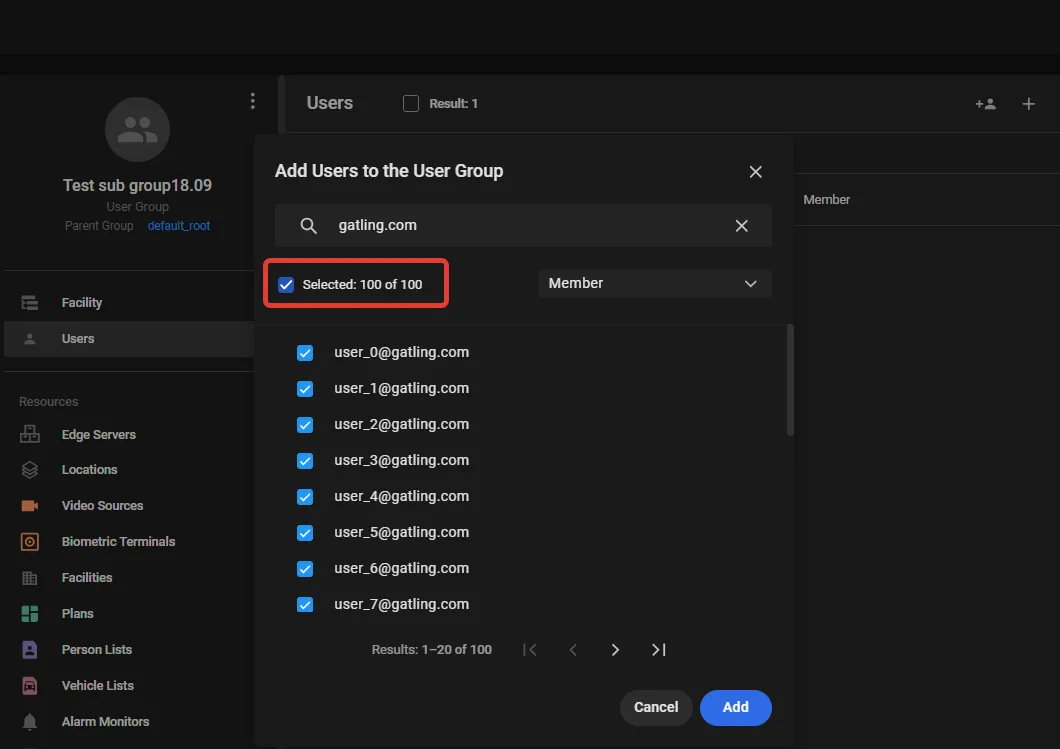
Multiple new members can be added all in the same role at a time, e.g., using a common email domain (e.g. “gatling.com”). To do so:
- Enter “gatling.com” into the search text box and click Search.
- Tick the multi-select checkbox as shown.
- Select a role, the same for all the new users, on the list at the right.
- Click Add in the bottom-right corner
To add a completely new member (the one missing on the consolidated system user list), click as shown to complete the fields on the Create user form that opens.
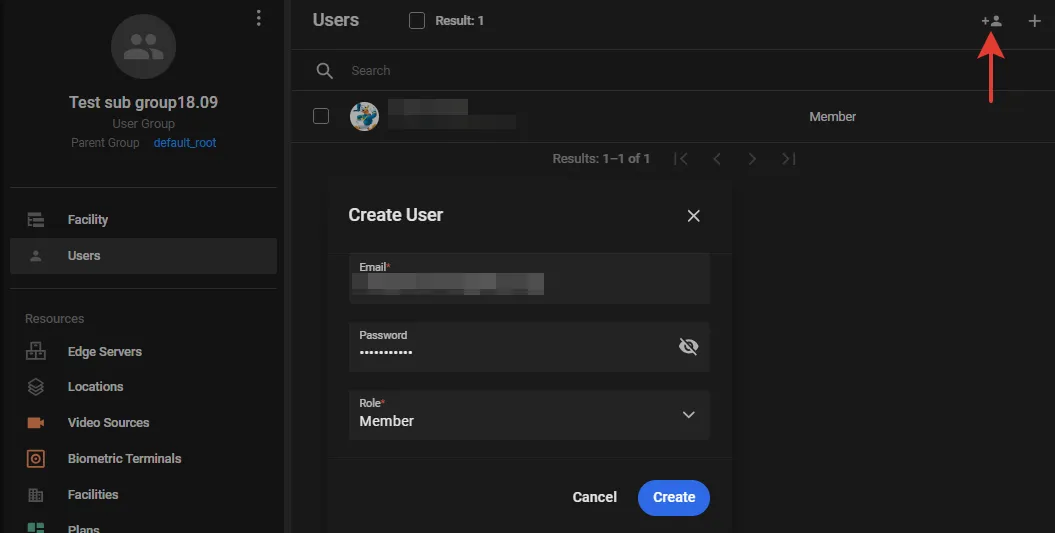
Then find the new user on the consolidated list and complete the new user details form.
Edit a Member of a Group
To edit personal data, role, etc., of a member of a group, click Edit as shown and enter new values into the Edit user form that opens.
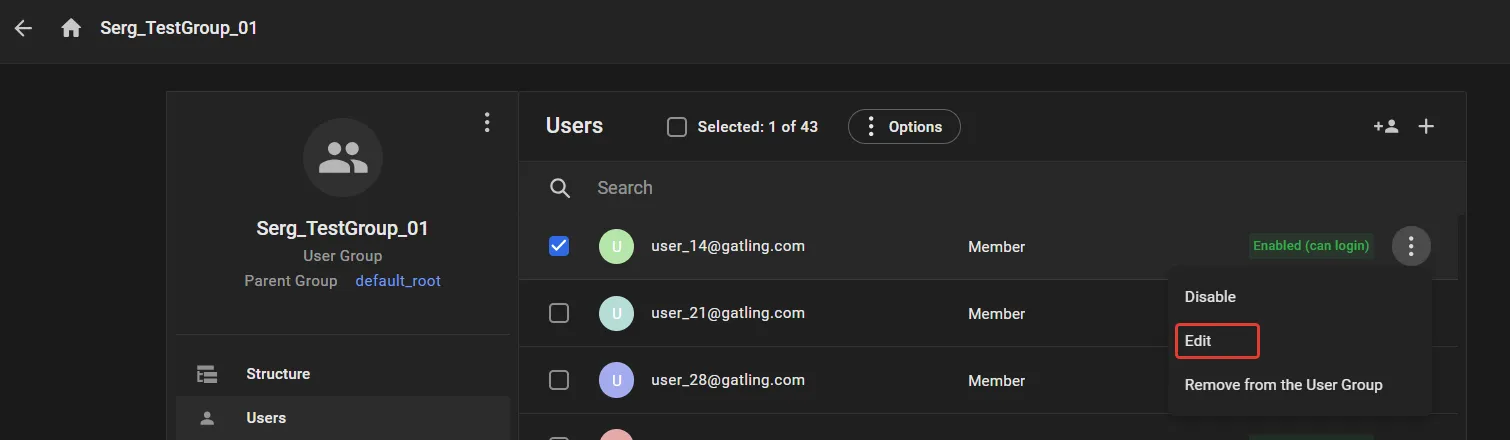
To apply a managing function (such as disable, change role, etc.) to multiple users in batch mode, checkmark those users on the list as shown and then click the function under Options.
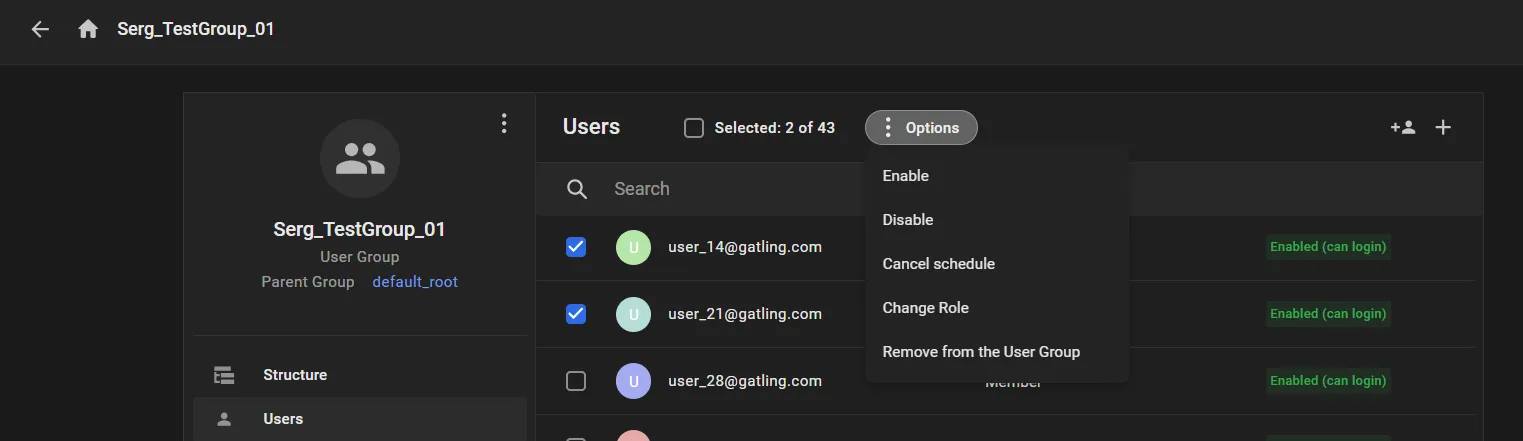
Remove a Member from a Group
To remove a user from a group, checkmark him or her on the list and click the “Bin” icon on the right.
Create System manager Account
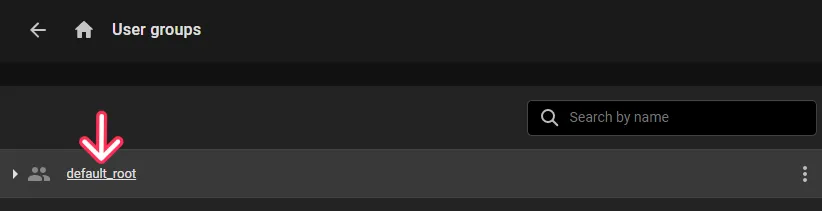
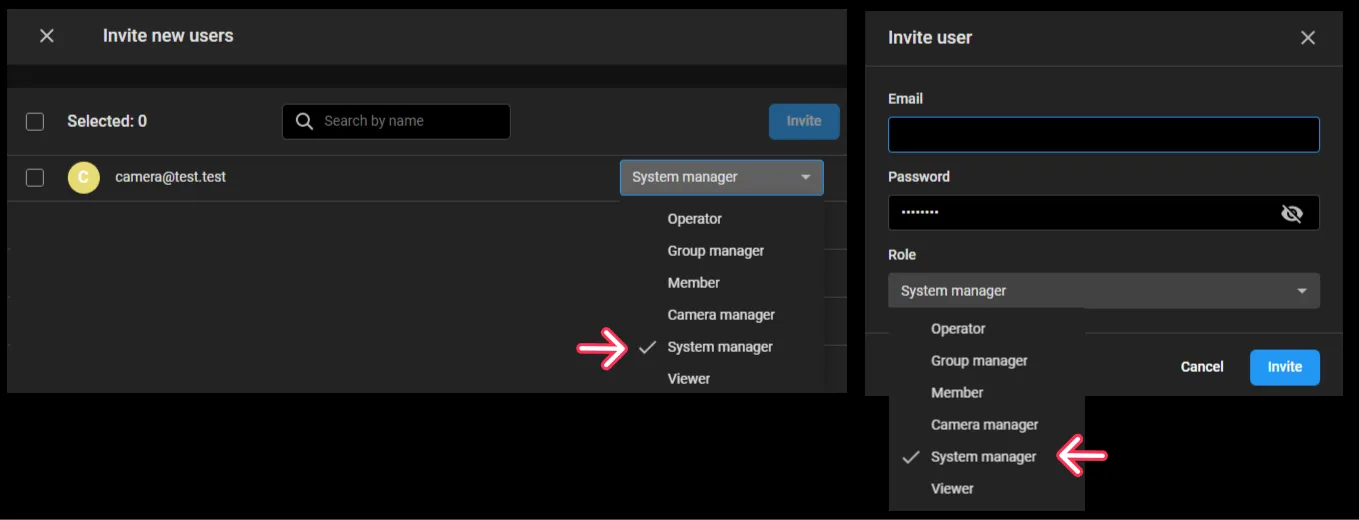
A user in a “System manager” role can only be added in a somewhat different manner. To do so:
- On the User Menu > User Groups screen, click the root node as shown.
- Follow the same procedure, selecting the “System manager” role on the lists where relevant.
Grant Access to Resources
Access to resources can be granted only to a user group as a whole, so every member of the group has the same access.
To grant a user group access to resources:
- Open User Menu > User Groups and select the user group.
-
On the user group page, in the Resources area, select a resource-type tab. The list shows resources of that type that the group already has access to.
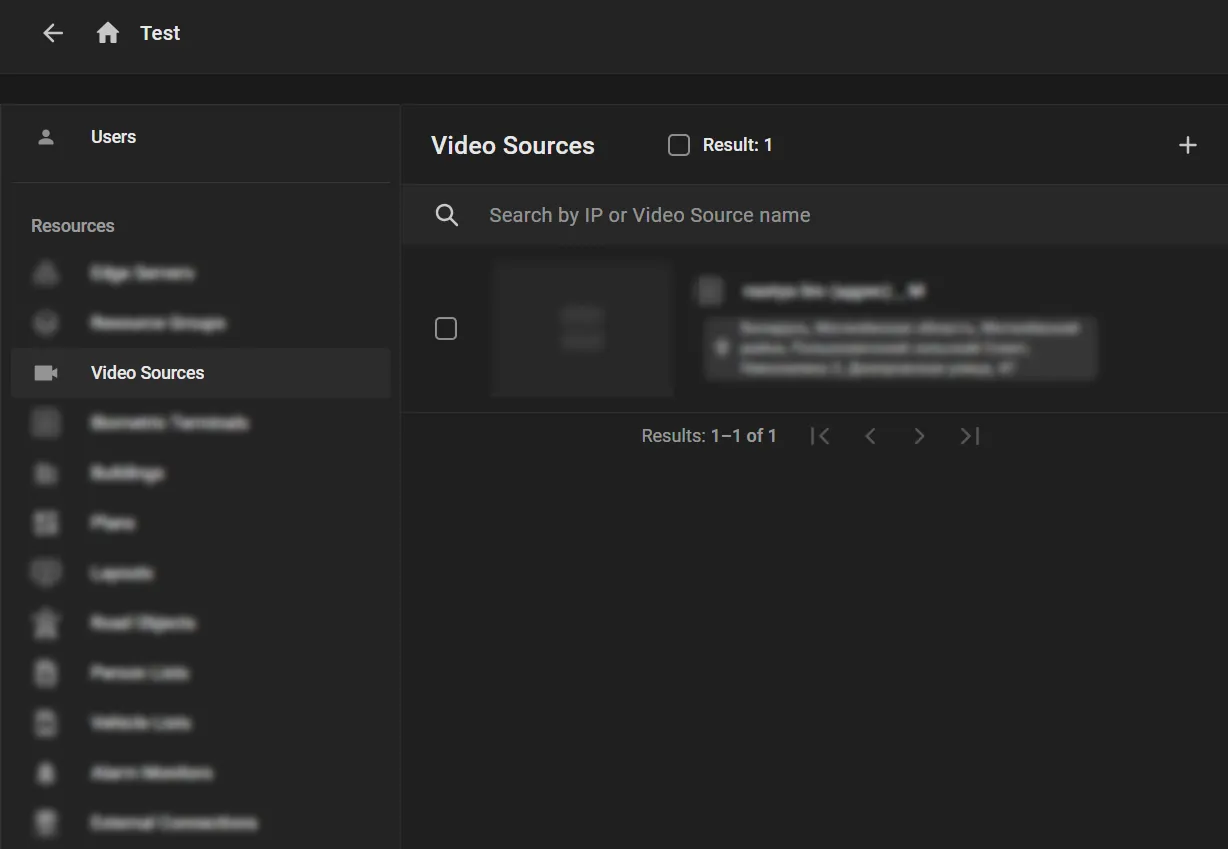
Tabs in the Resources area:
- Edge servers: servers that process video.
- Resource Groups: resource groups of different types created on the Resource Groups page.
- Video sources: cameras for live video and archive playback.
- Biometric terminals: biometric terminals for face identification.
- Buildings: buildings where cameras are installed.
- Plans: building floor plans.
- Layouts: live video from several cameras on one screen.
- Road objects: objects used to capture traffic violations.
- Person lists: person lists.
- Vehicles: vehicle license-plate lists.
- Alarm monitors: monitors for viewing and processing alarms.
- External connections: Sigur and Netping devices.
- Map marks: custom marks on the map.
- Map mark types: types of custom map marks.
- Click + in the upper-right corner. The platform opens a list of resources of the selected type that the group does not yet have access to.
- Select the resources to make available to every member of the group and click Add.