
FaceTrack Pro
Use the FaceTrack Pro module to recognize the face of a person of interest (e.g., a suspect or a missing child) or solve some other real-time and investigative analytics use cases according to the detailed descriptions in this chapter below.
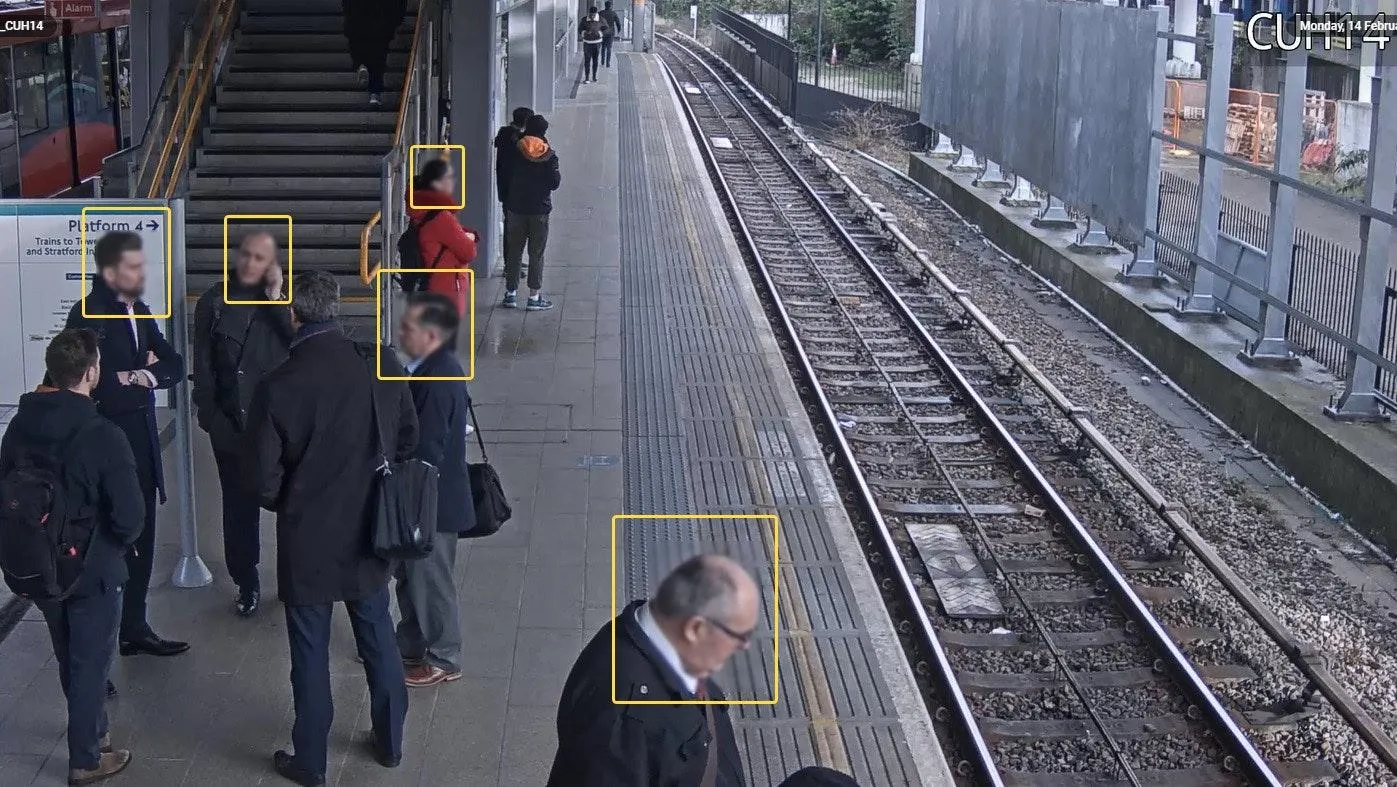
Meet FaceTrack Pro
How It Works
The module identifies enrolled faces among the many faces in a video. When similarity is above the threshold, the result is the enrolled person most similar to the detected face. Otherwise the result is No match.
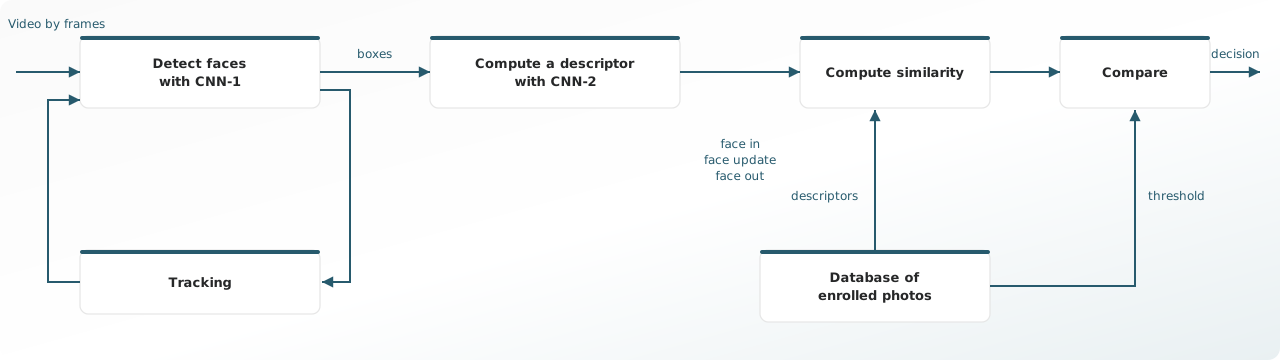
CNN-1, a convolutional neural network, checks every nth frame of the incoming video and finds the faces in it, whether or not they are enrolled.
Each detected face is tracked by correlation and passed to CNN-2, which builds a feature vector (a descriptor). Comparison then selects the stored descriptor closest to that new one. When the distance is under the threshold, the module reports that person as the identification candidate. Otherwise the result is No match.
Video has an advantage over a still photo. The module can pick the frame where the detected face is most similar to an enrolled face.
Computational Complexity
The algorithm is rated 5 on a 5-point complexity scale. Average CPU usage is about 100%, and the load can vary with video resolution and the processor.
Camera Requirements
To select cameras, use specialized software (for example, IP Video System Design Tool) or a free lens calculator from the camera manufacturer.
| Characteristic | Requirement |
|---|---|
| CMOS sensor size | 1/2.8″ or larger |
| CMOS sensor light sensitivity | 0.005 lux or less for a color image with automatic gain control (AGC) on at 30 IRE; 0.0005 lux or less for a black-and-white image with AGC on at 30 IRE |
| Electronic shutter speed | adjustable from 1/25 to 1/10,000 second, or a wider range |
| Electronic shutter speed adjustment modes | automatic / adjustment range / manual |
| Number of video streams | 2 or more |
| Primary stream resolution | 1280×720 to 2560×1920 pixels |
| Secondary stream resolution (optional, for layouts) | 320×240 to 704×576 pixels |
| Video frame rate | 15 to 25 frames per second |
| Lens type | varifocal |
| Focus adjustment modes | automatic / semi-automatic / manual |
| Lens focal length | 4 mm or longer |
| Lens speed | f/1.6 or faster |
| Lens aperture | adjustable |
| Aperture adjustment modes | automatic / manual |
| Primary stream bitrate | up to 8 Mbps |
| Secondary stream bitrate | up to 1 Mbps |
| Video encoding type | constant (CBR) / variable (VBR) |
| Video encoding protocol | H.264 HP/MP/BP, H.265 |
| Network protocol support | TCP/IP, ICMP, HTTP, HTTPS, RTP, RTSP, NTP, SNMP, IGMP, IPv4/IPv6 |
| Video transmission protocol | RTP over TCP |
| ONVIF compatibility (optional, for remote camera control) | ONVIF (PROFILE S, PROFILE G) |
| Adjustable image parameters | saturation, brightness, contrast, sharpness, AGC, and switching between color and black-and-white |
| Image parameter adjustment modes | automatic / manual / scheduled |
| Image enhancement | digital noise reduction (DNR), backlight compensation (BLC/HLC), and hardware wide dynamic range (WDR) of 120 dB or more |
| Noise reduction adjustment | automatic / manual (noise reduction levels can be adjusted) |
| Backlight compensation adjustment | automatic / manual (a target zone for backlight compensation can be set) |
| Wide dynamic range adjustment | automatic / manual (the WDR level can be limited) |
| Built-in illumination (optional) | 20 meters or more |
| Illumination modes | automatic / intelligent / manual (range and intensity can be adjusted) |
Camera Mount Requirements
| Characteristic | Requirement |
|---|---|
Camera tilt relative to the horizon
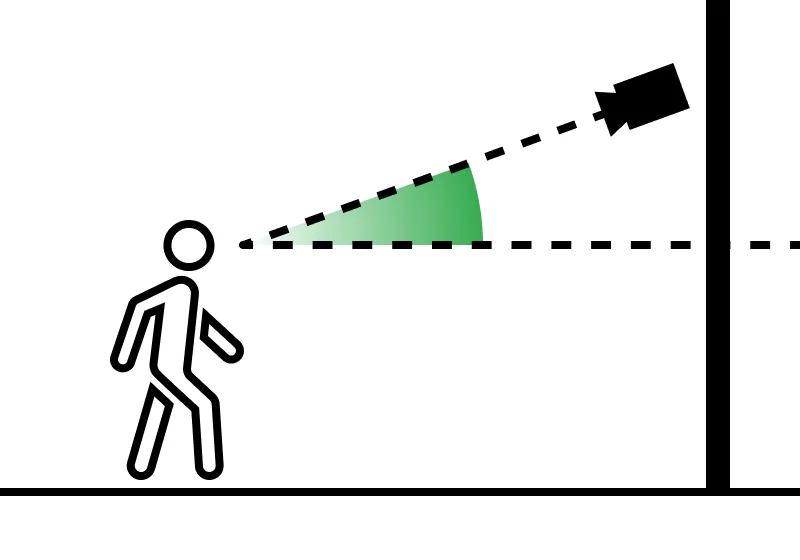 |
0° to +5° |
Camera pan from the direction of approach
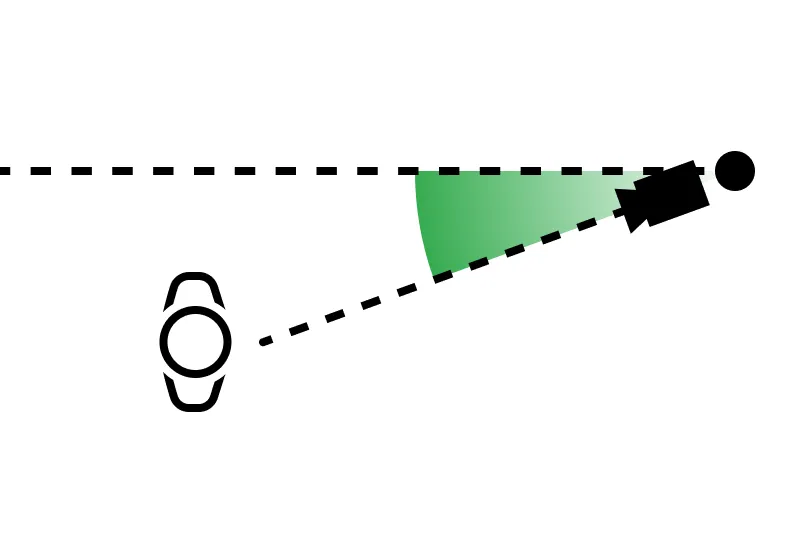 |
−5° to +5° |
Camera roll about its axis
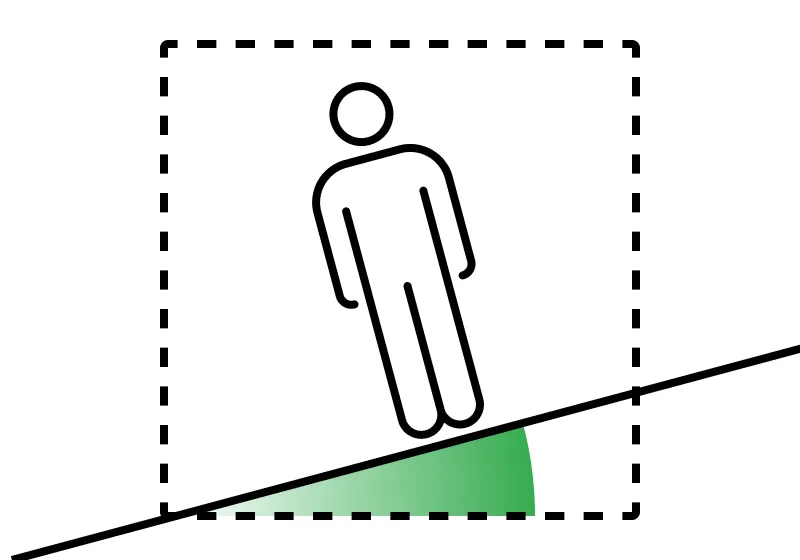 |
−5° to +5° |
| Image quality at the border of the controlled zone | 500 pixels per meter or more |
| Recommended mounting height indoors | 1.8 to 2.5 meters above the floor |
| Recommended mounting height outdoors | 2.5 to 3.5 meters above the ground |
| Illumination of the controlled zone | 150 lux or more across the camera scene. The face must be lit evenly, without strong shadows under the eyes, light from one side only, or sudden changes in light as the face crosses the recognition zone. |
How to Find a Suspect
Finding a suspect may be an important part of a post-incident investigation. If this is the case, use any of the previously described techniques depending on what is known about the person: name or other text attribute, photo or distinctive features.
However, it might be a real-time use-case as well. Then do:
- Analyze which of the existing cameras fit for face recognition.
- Enable the FaceTrack Pro module on those cameras and set it up.
- Add the suspect to a personal list in the database keeping in mind the ethical considerations and grant access to the list to the user group tasked with finding the suspect.
- Build an alarm monitor with Lists = that in item 3 and Analytics modules > FaceTrack Pro > Matchcheckmarked, configure notifications..
- Whenever an alarm comes, verify it before taking any action that might seem like an unfounded intrusion into someone's privacy.
How to Find a Missing Child
Since a highly sensitive issue is touched upon, close attention should be paid to the correctness and updateness of information on the missing child list in the person database.
A missing child's personal data can only be taken from an institution that has enough authority to possess and maintain it. Such database might contain multiple entries, which can be imported into a person list in batch mode. Then take special care to keep it continuously updated. However, a better solution would be to contact the Platform representatives, asking us to build an interface to the source database through the system API.
In any other respect, the missing child use case does not differ much from that of a suspect in real-time.
How to Manage Biometric Access
Regulated access e.g., to premises, can be implemented using the face recognition capabilities of the Platform and the interfaces it has with external devices, such as smart locks. To do so, create a person list holding the entries of those who have access and configure the connection to a smart lock. However, pay special attention to a similarity threshold value in order to keep the acceptable balance between false negative and false positive predictions.
Set Up Face Recognition
- If there is a GPU to be tasked with face recognition calculations, switch on the Run on GPU option to speed up those.
- Edit the Region of interest,which defaults to the full frame.
- Assign a priority to the "No match" events according to need.
- Select the Highest accuracy or Minimum delay performance mode on the Identify with ... list.
-
Switch on/off the the Recognize small faces option to improve detection of faces of
about 5% in size of the frame height and smaller.
The option is not available with the Run on GPU switched on. - Switch off the Recognize appearance features whenever it is irrelevant thus saving the system computational resources.
- Switch on the Limit minimum face size option to ignore faces smaller in size than the limit, set graphically by resizing the yellow rectangle that appears in the frame.
- Switch on the Re-recognize face option according to need and set a Re-recognition interval.
- Switch on the Limit face angles option to lower the recognition error rate.
- Click the Apply to start streaming the “Match <name>” and "No match Unknown>" events onto the Events screen of the Platform.
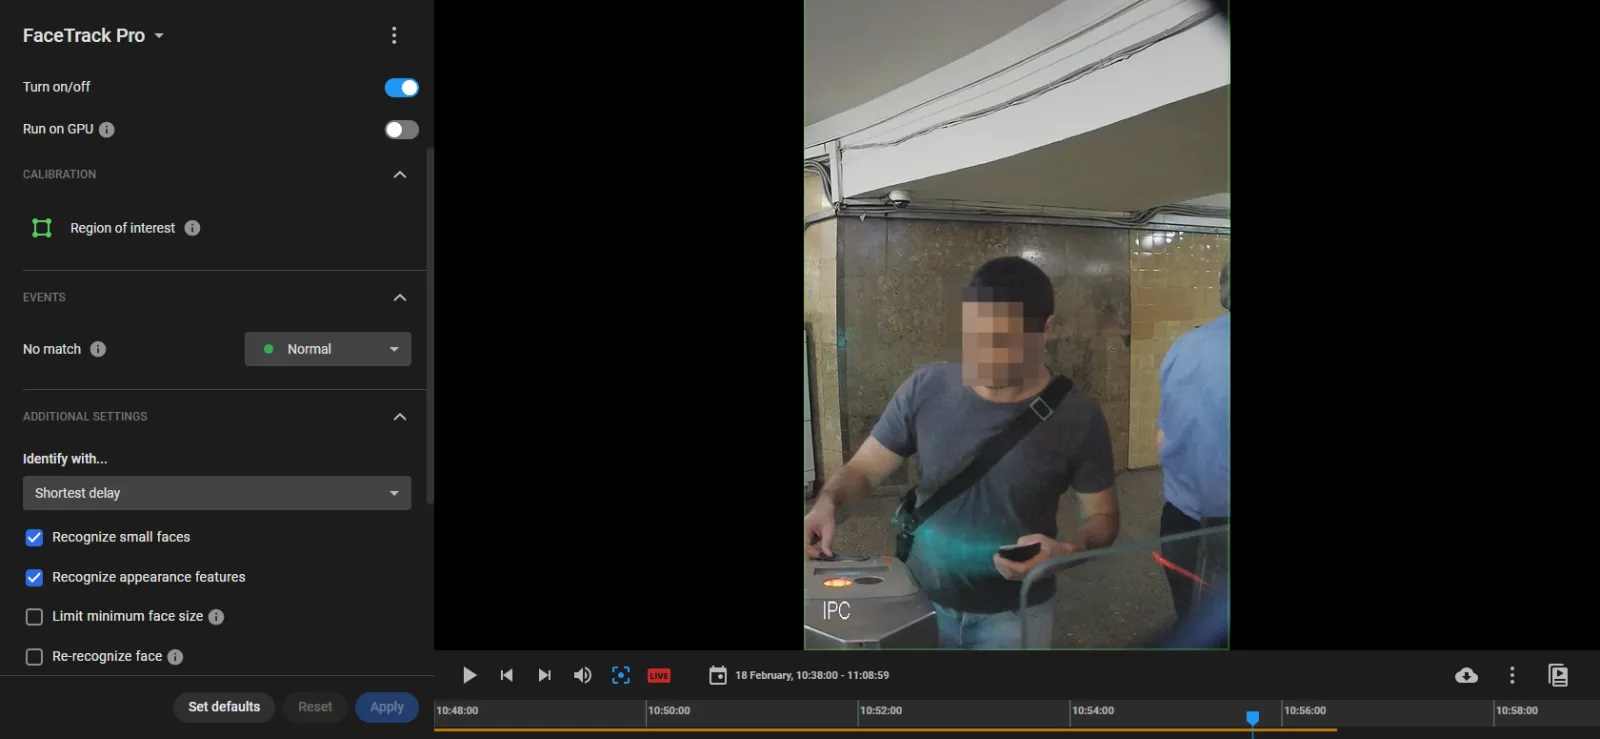
To move a vertex, point the cursor onto it and drag and drop it.
To delete a vertex, double-click it.
To add a vertex onto an edge, double-click where the vertex should be.
To move the region as a whole, place the cursor inside it and drag-and-drop.
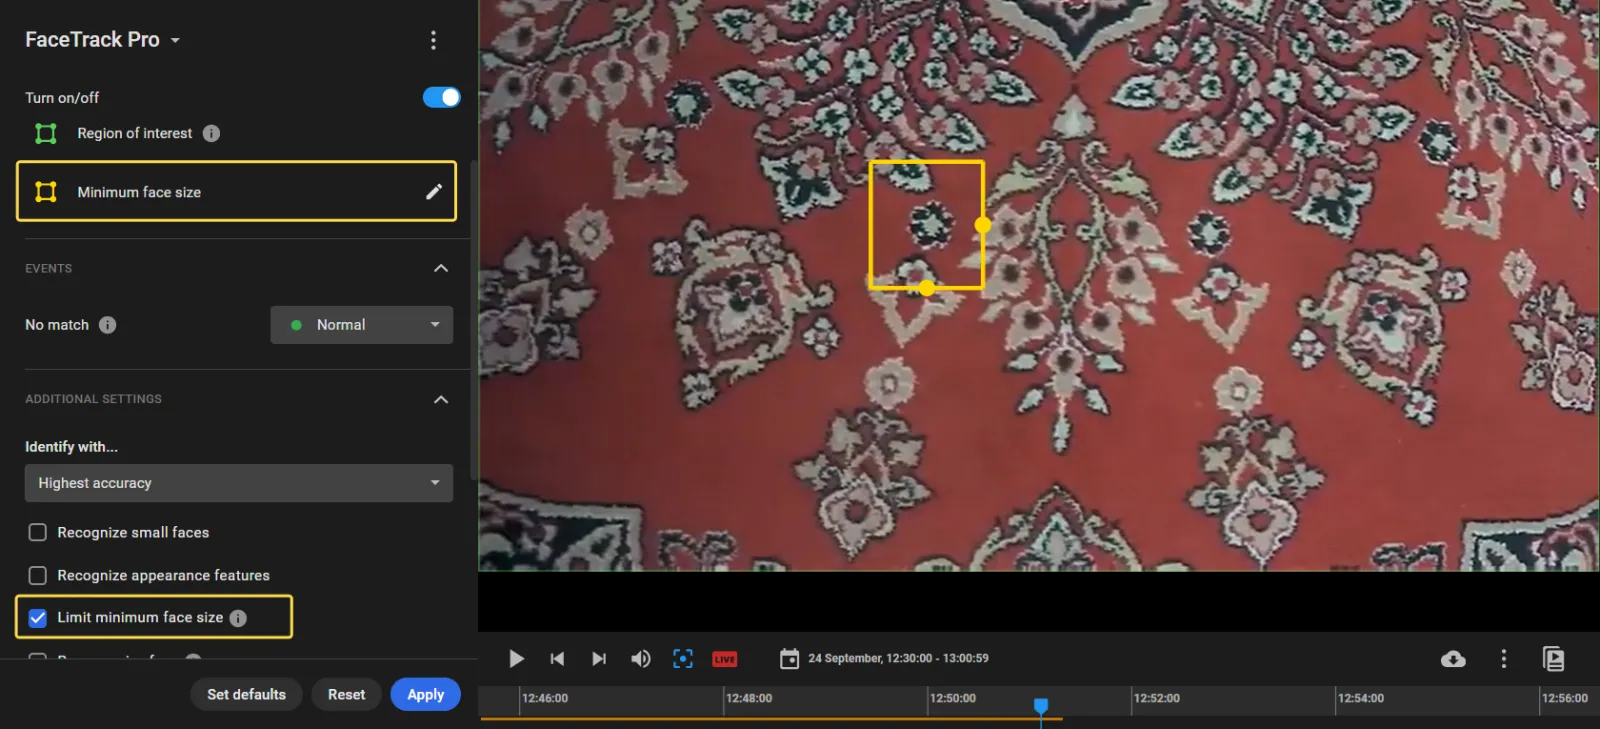
This will prevent e.g. a biometric access camera from making too early "Match" or "No match" decisions e.g. when the candidate is too far from smart lock.
With the option switched on, face recognition calculations will repeat every Re-recognition interval seconds if the face stays in the frame, and new events generated according to the result.
With the option switched on, recognition calculations wil not be run with faces tilted or panned above the limits.
Tips to Review Face Recognition Events
Create an alarm monitor holding the suspect's "Match" events (if his or her identity is known) or configure the monitor by suspect's appearance features (otherwise) to shorten the response time to an incident of this kind. However, an alarm on this monitor still needs verification before taking any action that might infringe on someone's privacy and human rights.
To verify an alarm, click the alarm card on the alarm monitor to open the pane on the right, holding:
- Time and location tags of the event
- Similarity score
- Person appearance features (demographic group, glasses, beard, etc.)
- The link to the full personal entry in the database.
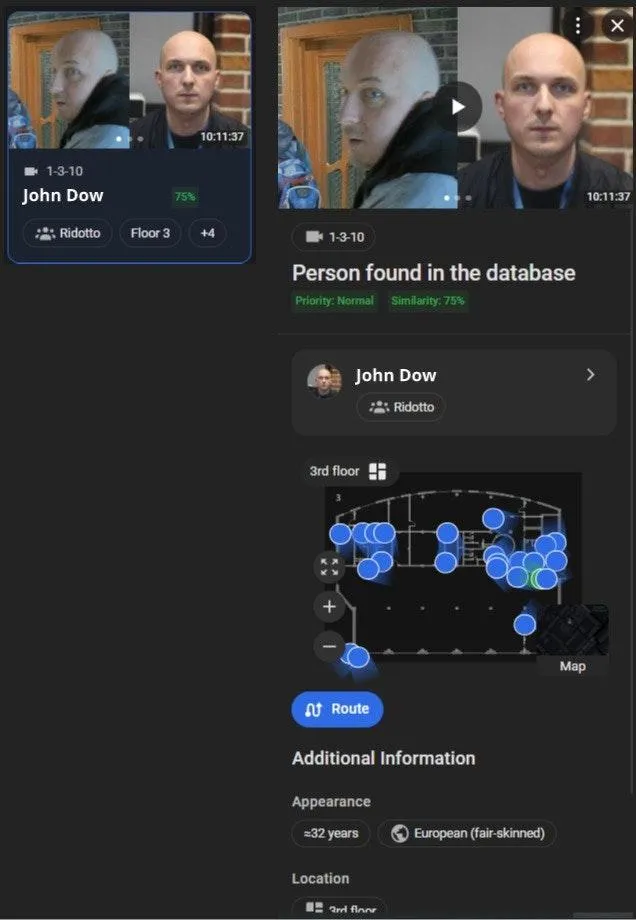
Re-estimate the relevance of these data to the wanted person under the current circumstances. Playback the event to verify it before responding to it, keeping in mind the ethical considerations.
Verify to Be Ethical
All the existing face recognition algorithms (as well as a human brain) show different accuracy rates for different demographic groups of gender, age, and skin color. The bias is difficult to avoid due to natural variations in training datasets. Although AI scientists are doing their best to eliminate all traces of this bias, still any actor in the area of face recognition should remember it. On the other hand, an incorrect response to a false identification may have serious consequences as for human right violation, financial and reputational damage, etc.
So, verify the event as thoroughly as possible before responding to it, taking into close consideration every relevant aspect.
- Above demographic bias, there might be other uncontrolled reasons for recognition errors. The best way to estimate error probabilities in each particular Customer's environment is to collect a statistically significant amount of raw data (video) and pass it to the IREX team for measurements directly in an experiment.
- If in doubt, system logs are available to show who added a person to the database and when, and what the grounds were.
- Personal data can also be checked for being up-to-date to make sure the right to be forgotten is respected in each particular case.