
Manage Cameras
Video cameras are the prime information sources or IREX.
Camera Requirements
The minimal camera requirements are:
- Video streaming: RTP/RTSP over TCP or UDP
- Video compression: H.264 Baseline Profile
- Resolution: 720 x 480 (NTSC), see also resolution requirements for each video analytics module.
- Valid RTSP URL with a static IP address
All ONVIF Profile S cameras can vbe connected too.
Configure Cameras
Due to the compatibility and security requirements, IREX does not support a plug-and-play camera connection. A qualified network engineer is required to configure the camera and the router in order to enable video streaming from cameras to the Platform instance.
To prepare cameras for connection:
- Ensure the camera has a valid network configuration including IP address, network mask, gateway, and NTP client configuration. The correct time and timezone are essential for video archiving.
- Use the best security practices to protect the camera: install the latest firmware, generate a strong password and disable third-party cloud connections and unnecessary services.
- Ensure the camera mount position, height, angle of view, and resolution meet the requirements of the video analytics modules planned to run on this camera.
- Set the video resolution to 1920x1080 or 1920x1440 on the primary stream and 740x480 (NTSC) on the secondary stream. The secondary stream (sub-stream) is an option needed only for efficient video playback in Layouts.
- Set the video codec to H.264 Baseline Profile or H.265. H.265 playback is available in the latest version of Google Chrome. The graphics card must support H.265 decoding.
-
Set the video codec mode:
VBR (variable bitrate) with a limit to 5 Mbps (recommended);
CBR (constant bitrate) at 5 Mbps if VBR with a bitrate below the limit is not available or the scene is very busy (e.g. airport entrance). - Set the audio code to AAC . G.711ulaw and PCM are also supported. Audio streaming is optional.
- Note the RTSP URL for the primary and the secondary streams.
- Test the RTSP URLs in a media player such as VLC. Note the bitrate of the video stream.
How to find a camera's RTSP URL?
RTSP stands for Real Time Streaming Protocol. RTSP allows pulling a live video stream from a camera or NVR. International security standards such as ONVIF and PSIA rely on RTSP. Virtually all security cameras (except closed systems such as Verkada) are capable of transmitting RTSP.
The common format of the RTSP URL is:
Note that in most cases, the word “server” is a substitute for “IP camera” since every IP camera has an RTSP server built in. Parameters in brackets are optional.
-
ip_address
Typically, the RTSP servers use DHCP to obtain an IP address automatically. The servers usually provide a utility for detecting the server’s IP address in the usual IPv4 format (xx.xx.xx.xx), or a valid host address accepted by the standard function inet_addr.
For example, “localhost” is equivalent to 127.0.0.1. This is usually the IP address of the sending (server) computer.
-
rtsp_port (Optional)
The port number on which the server is listening for RTSP commands. The port number must be an interger from 1 to 65535; 554 is the default for RTSP.
-
username / password(Optional)
For servers that use authentication, add a username and a password to the RTSP URL string.
-
server_URL
Each RTSP server has its own relative server URL, so consult the server’s manual to obtain it.
-
paramN=valN(Optional)
Extra parameters in this context are server parameters that can be used to control compression, video size, etc. See the examples below for such parameters.
Example RTSP URLs
These examples are here to merely illustrate possible formatting for the RTSP URLs. They will not work for testing RTSP sources.
- Axis
- Hikvision
- Dahua
If the RTSP URL for a camera is not available, try the following tips:
- Ask the network administrator or the camera installation company.
- Use ONVIF Device Manager to discover cameras and their RTSP URLs in the private network.
-
Search the camera manual for the
rtsp://link. - Check iSpy Camera Connection Database.
Configure the Network
The network shall provide sufficient bandwidth to transmit the video stream from the cameras to the Platform instance (i.e. uplink), that can be hosted by IREX or the client. The typical bitrate for a Full HD camera in a public space is 5 Mbps.
Connecting a Camera to the Cloud
Option 1: NAT (the video streams will NOT be encrypted)
- Setup a Network Address Translation (NAT) on the router to connect a camera from the private network to IREX.
- In the RTSP URL, use the external IP address of the router and the NAT port instead of the internal IP address and port of the camera in the private network. The router must have a static IP address.
Option 2: VPN (the video streams will be encrypted)
- Setup a Virtual Private Network (VPN).
- Use the original RTSP URLs of the cameras in the private network.
Option 3: Platform Edge Server (the video streams will be encrypted)
- Install the IREX Edge Server in the private network.
- Use the original RTSP URLs of the cameras in the private network.
How to Make Sure RTSP Streams from the Cameras Are Coming In
Simply play the RTSP video stream with any video player (e.g. VLC) from the internet (not from a private network). If the video stream is available, the settings are correct.
Connecting a Camera to a Private Cloud
No special network configuration is required if the cameras and the Platform instance are in the same routable network. Use the original RTSP URLs of the cameras in the private network.
Add and Manage Cameras
Register a Camera
To connect a camera to IREX:
- On the User Menu > Settings > Cameras screen, click the "+" — Create camera in the bottom-right corner of the screen.
-
In the Edge server section on the
Add camera screen that opens, select an edge server
on which to execute video analytics.
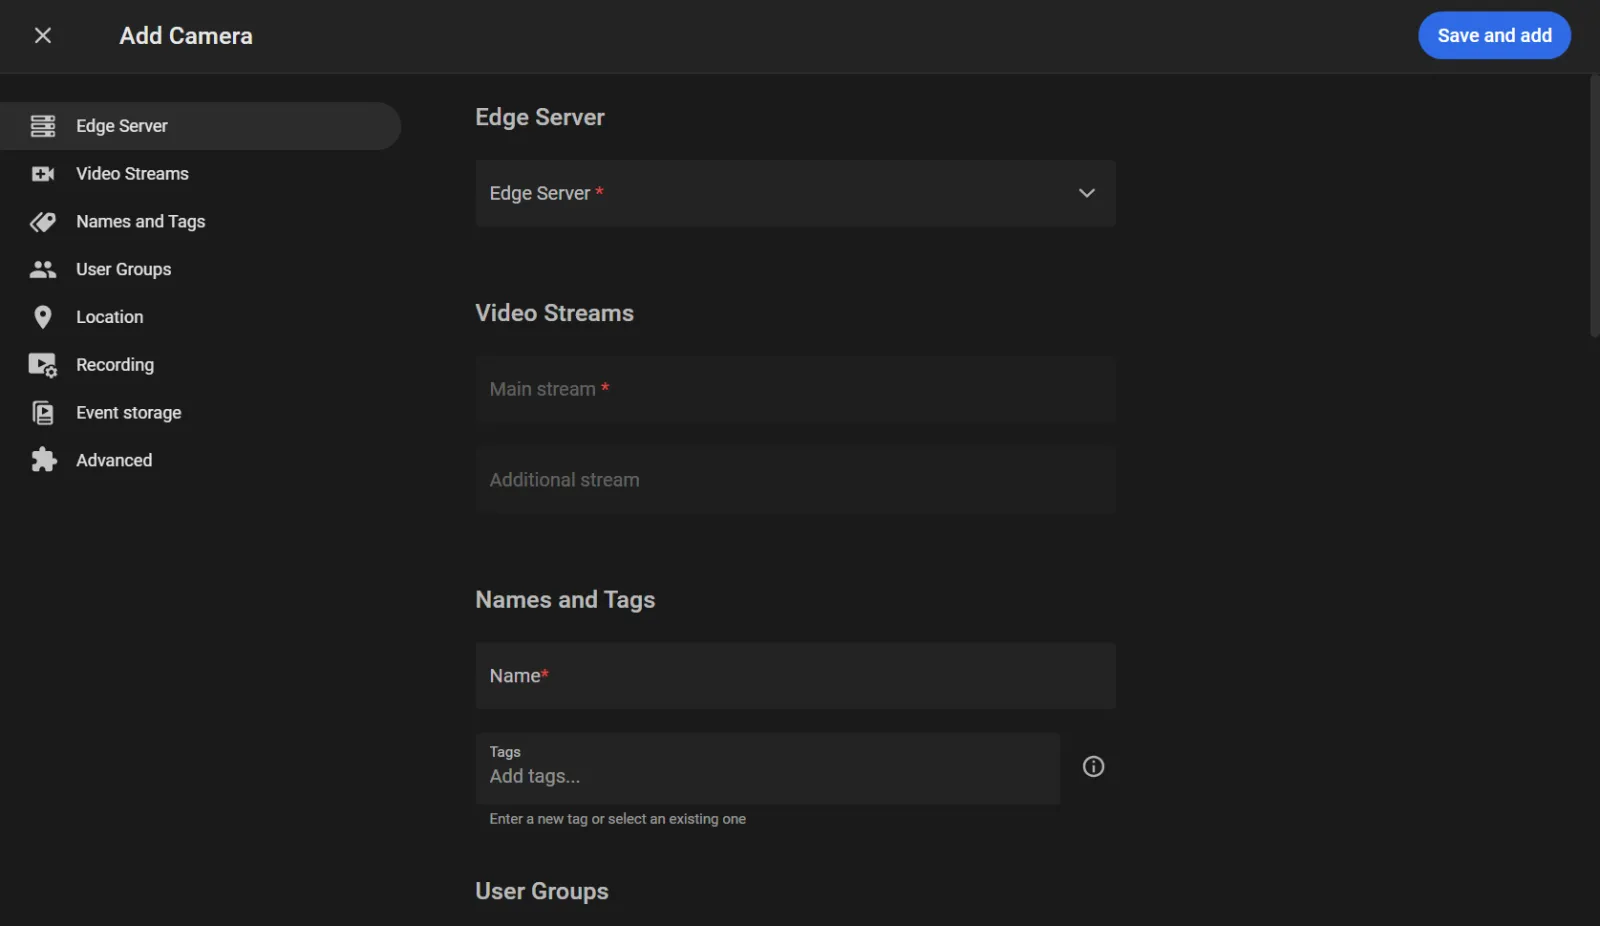
- In the Video stream section select a TCP (recommended) or UDP data transfer protocol.
- Paste the camera's RTSP link into the field of the same name (see the above instruction).
- Click the Additional video stream to repeat the same actions for the additional stream when using a low-resolution sub-stream for live video playback in a Layout.
- In the Name and Tags section enter the name of the camera in the Name text box.
- Enter camera tags in the Tags, or select those from the existing ones.
- In the User Groups select user groups to be given access to the camera.
- In the Location group navigate to the camera location on the map and click; then rotate the • ️to set the camera view angle.
- In the Recording settings group select output resolution and bitrate on the Select video stream characteristics list.
- Switch on/off the Record video option to save the records to the cloud storage.
- Switch on/off the Mute recording mode (self-explanatory).
- Select a video storage depth in the Archive depth under the Video storage depth.
- Select an event storage depth in the Archive depth under the Event storage depth.
- Select a frame retention period under Frame storage depth.
- In the Advanced group, switch on/off the PTZ Camera and Thermal imager options.
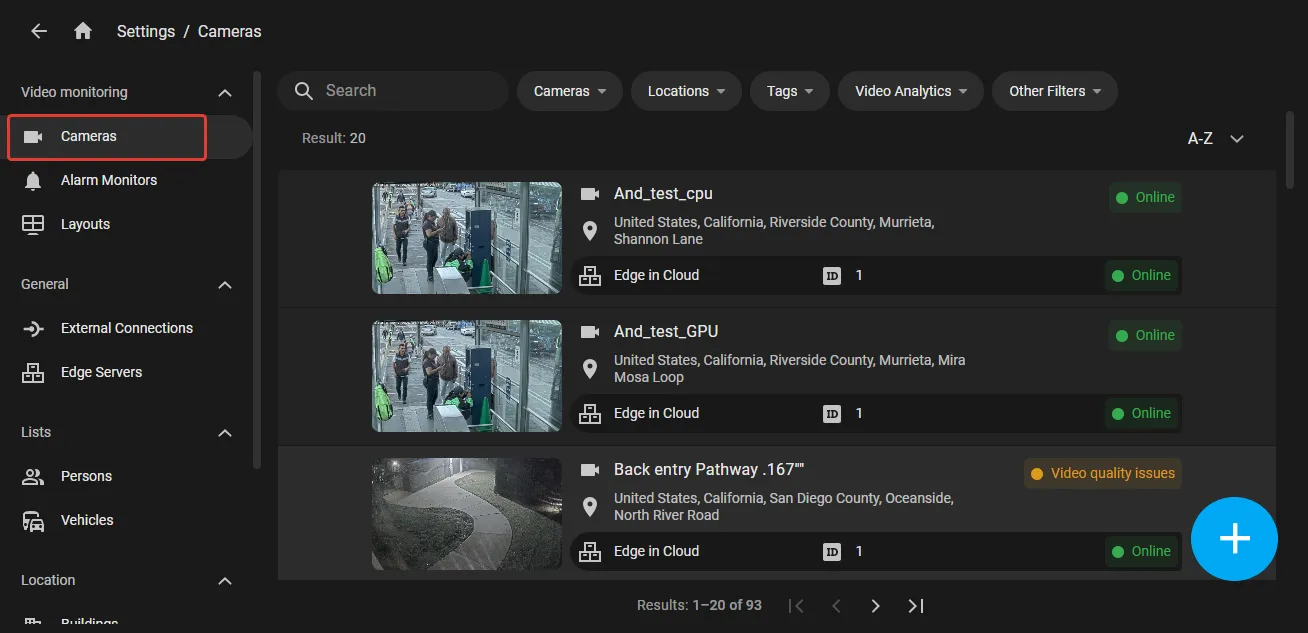
The camera name and tags are shown on the camera card; they also facilitate by-name and by-tag search for a camera.
Use the address of the camera to quickly find it on the map.
Click on a building passes its coordinates to the camera.
Videos will be retained for this period of time. The default archived depth (retention period) is 30 days.
Frame storage depth is how long event video frames are kept, in days. The value cannot exceed Event storage depth. After frames expire, the event card shows the default system image; the event record itself remains available until the event retention period ends.
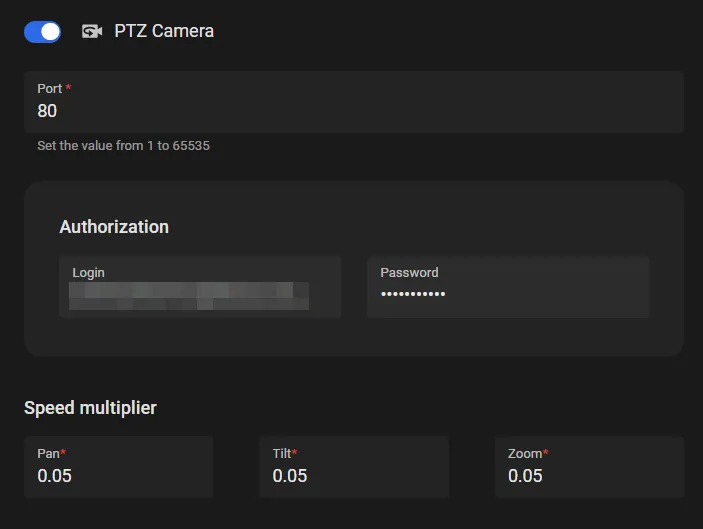
PTZ Camera Settings
Switching on the PTZ camera setting requires the Port number (“80” be default) and, optionally, credentials to a ovinf protocol account. Refer to the camera manual to enter those as shown.
Enter a Speed multiplier between 0.01 and 0.5 (0.05 by default) to make it easier to control the camera by angles and zoom.
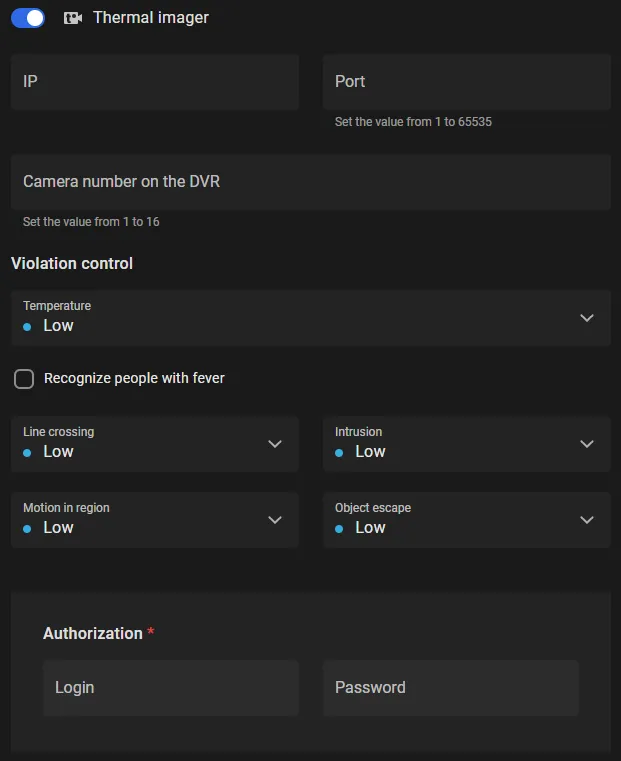
Thermal Imager Settings
Switching on the Thermal Imager option requires IP, port number, and camera number on the DVR to be defined. Besides, switch on the thermal-related events to report.
Turn Camera Off
When the camera is off, video is not recorded, video analytics modules are not running, and live video is not transmitted to users.
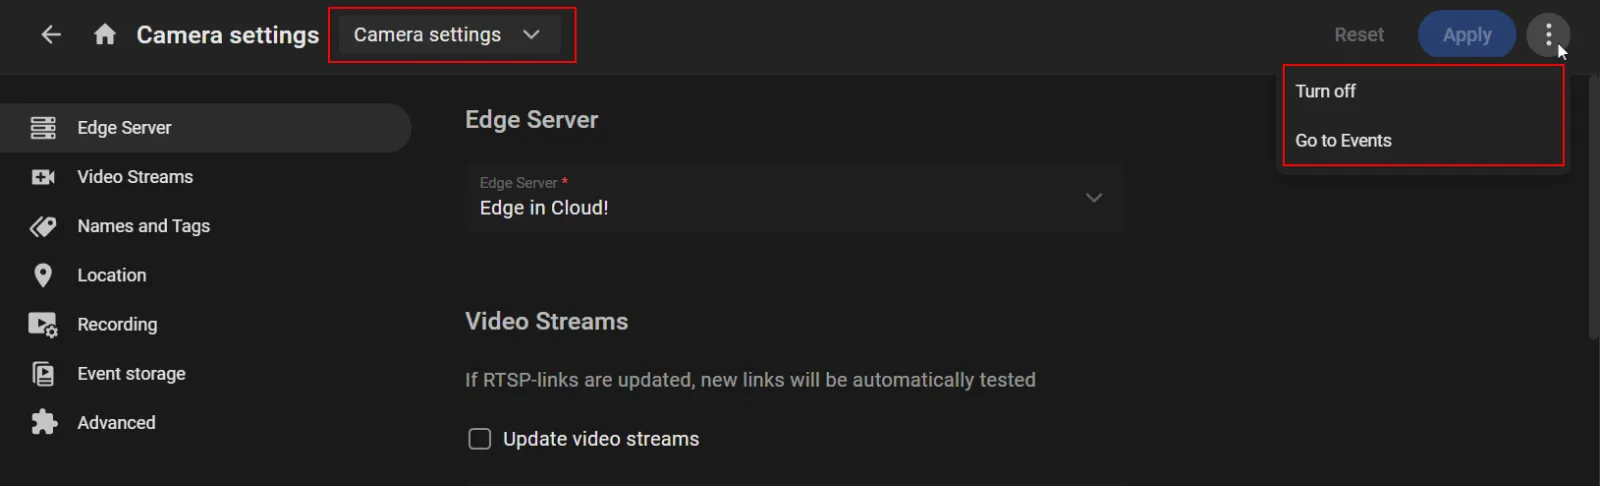
To do so, use the Turn off command in the three-dot menu ⋮ on the list of connected cameras.
Edit a Camera
To edit camera settings, open Settings > Cameras and in the camera options menu select Camera settings.
The camera settings page is also available from:
- the options menu on the camera card on the Cameras page;
- the options menu on an event card;
- the player settings panel during video playback;
- the Video Analytics settings page.
Parameters on the camera settings page are almost identical to those on the Register a camera page.
The following fields are available for editing on the camera settings page:
- Update video streams: enable this option to change the main or additional RTSP address of the camera.
- Main stream: the camera RTSP address; editing is available when Update video streams is enabled.
- Additional stream: the camera RTSP address used to play video at a lower resolution in Layouts mode. Editing is available when Update video streams is enabled.
- Name: the camera name shown in the system (for example, in the camera list or on event cards). The name can contain up to 1028 characters. Several cameras may share the same name.
-
Tags: used to classify the camera and make it easier to find.
To add a new tag, enter its name and press Enter.
To find and add an existing tag, start typing its name and select the matching option from the drop-down list of tags that contain the entered characters.
When a new tag is typed, the system may also suggest existing tags that contain the entered characters in the drop-down list. In that case, pressing Enter saves the first suggested tag from the list, not the typed tag. To save the typed tag, press Esc first to close the drop-down list, then press Enter.
- Location: select the camera location on the map and set the view direction by rotating the point in the field-of-view area on the camera icon. To find a place, pan the map or enter an address, place name, or GPS coordinates in the text search field. Buildings appear as separate objects on the map at 15× zoom.
- Address: filled in automatically when the camera location is selected. Wait until the address is resolved before saving the page.
- Additional information: optional extra details about the camera location.
- Video quality: the list of available video stream resolutions. Editing is available when Update video streams is enabled.
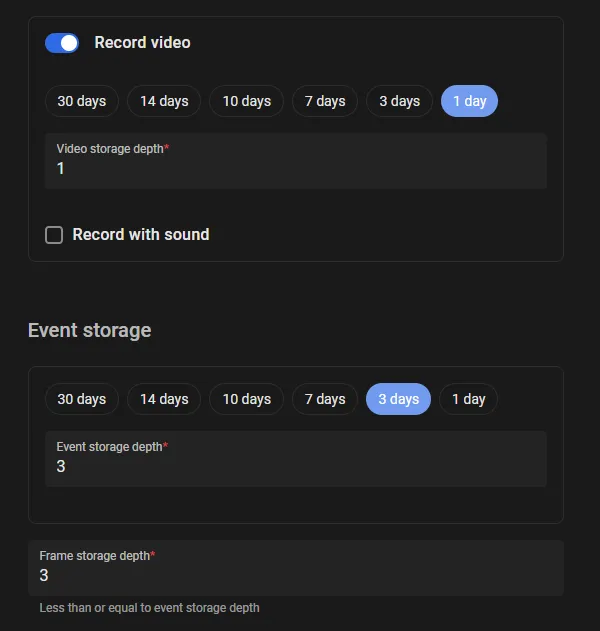
- Record video: turns saving video to cloud storage on or off.
-
Video storage depth: how long video is retained.
The Video storage depth set when the camera was added cannot be reduced while editing the camera. To use a shorter retention period, remove the camera from the system and register it again with the smaller value.
-
Record with sound: turns recording with audio on or off.
-
Event storage depth: how long events captured by the camera are retained.
The allowed range and the default value for these parameters are set separately for each cluster.
If the cluster configuration sets the minimum event storage depth to 0 days, the No record events option becomes available. When that option is enabled, the system does not store events captured by this camera. Such events and their video frames are still sent to external systems if Alarm Monitors have Send events to external systems enabled and the required settings are in place. The Frame storage depth field is unavailable in that case.
- Frame storage depth: how long event video frames are kept, in days. The value cannot exceed the event storage depth. If the frame retention period is shorter than the event retention period, after frames expire the event card shows the default system image; the event itself remains available until the event storage depth ends.
-
PTZ Camera: turns registration of a PTZ camera on or off.
In the additional area that opens when PTZ Camera is selected, fill in the following:
- Port: by default, port 80 is used to control the PTZ camera.
- Speed multiplier: controls PTZ camera speed in the player. By default, the multiplier for Pan, Tilt, and Zoom is 0.05. Allowed range: 0.01–0.5.
- Authorization: optional (depending on the camera model); an ONVIF protocol account may need to be created in the camera’s own settings (see the camera documentation). Enter that account’s login and password in the Login and Password fields.
- Thermal imager: turns registration of a thermal imager on or off. When the option is selected, fill in the required connection and event-capture settings in the form that opens.
To save changes, click Apply.
The options menu includes:
- Turn on / Turn off: turns the camera on or off.
- Go to Events: opens the Events page with the camera selected in the Cameras filter.
Unregister a Camera
Unregistering a camera loses videos and events from it.
To unregister a camera, click the Delete command in the three-dot menu
 on the camera list.
Manage Access to a Camera
Access to cameras can only be managed on a “by user groups” basis.
- In the Video sources section on the user group's screen, click the “+” as shown to open the consolidated list of all cameras not assigned to that group yet.
- Checkmark the cameras to assign and click Add.
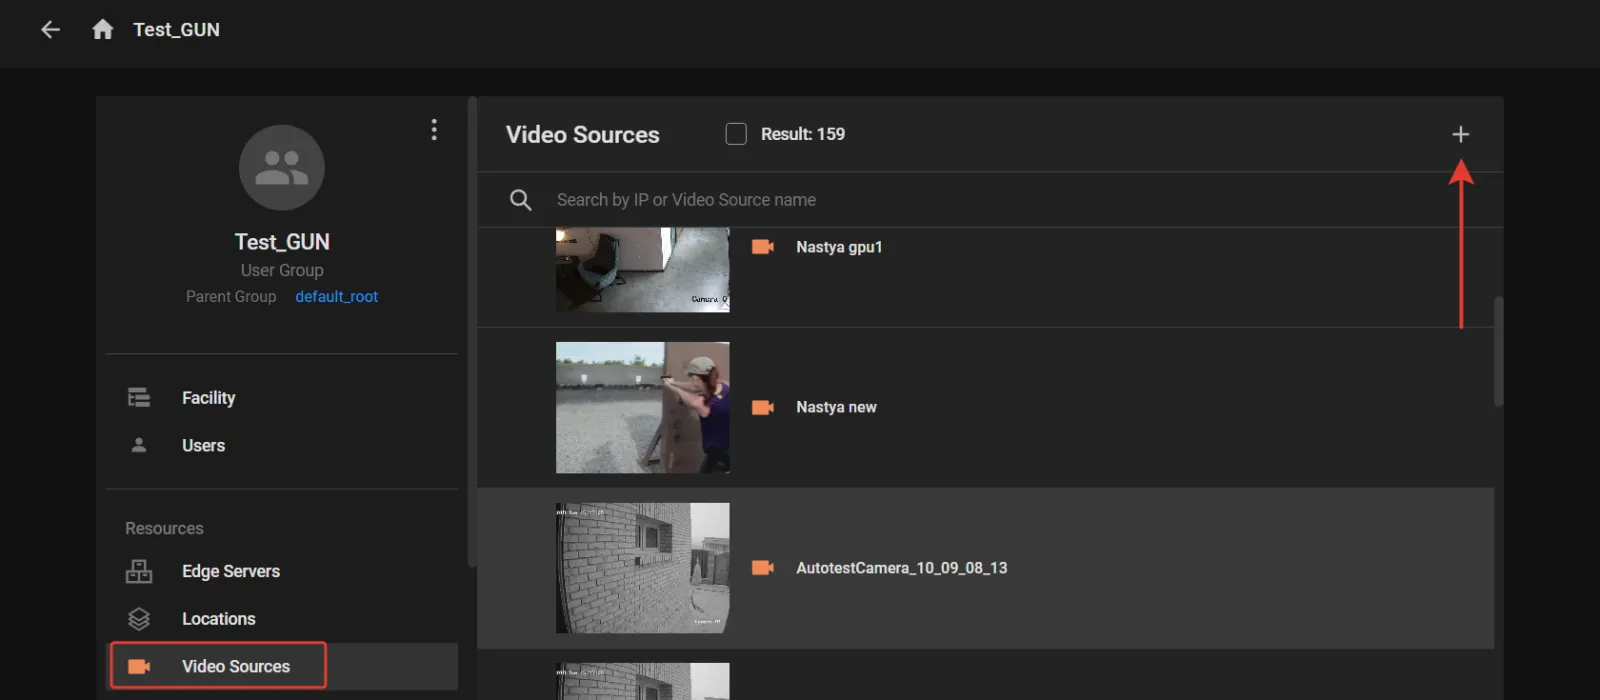
To unassign a camera from a user group, checkmark it in the Video sources section on the user group's screen and click the “Bin” button. However, if a camera has become accessible because the user group was granted a resource group that includes that camera, the check mark is blocked. Cameras like these cannot be unassigned from a user group this way. In this case, unassign the resource group.
Also, keep in mind the “no orphaned resources” restriction.