
Persons
Person Database
Person database content and functionalities are on the People screen, which opens when running People in the main menu.
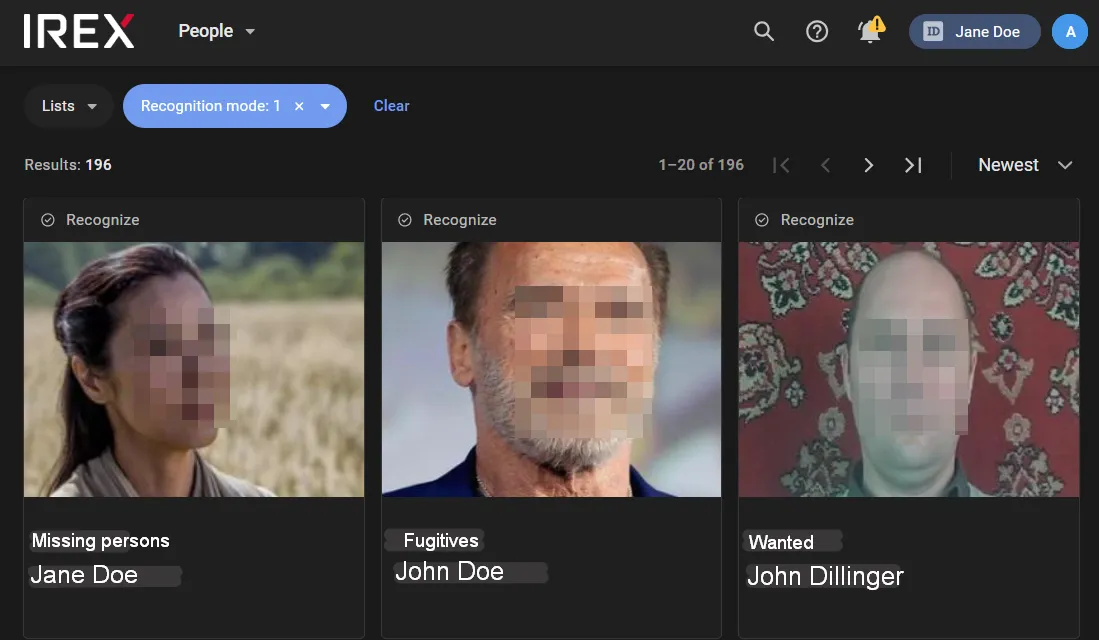
Personal entries in the database are presented as cards, each of which holds:
- Person recognition mode ("Recognize" or "Archived")
- Photo
- The name of the person list that the person belongs to (e.g. “Missing persons”)
- Full name.
In the three-dot menu on a card, find the commands to execute the following actions:
- Search events : to open the Events screen holding all events with that person detected on all the Platform instance cameras.
- Download photo/ all photos : to save the person's photos locally.
- Build route : to build the route of the person in the form of a broken line connecting all his or her appearance locations
- Edit - to edit the personal data.
- Delete - to delete the personal entry in the database.
Ethics Always Comes First
All the existing face recognition algorithms (as well as a human brain) show different accuracy rates for different demographic groups of gender, age, and skin color. The bias is difficult to avoid due to natural variations in training datasets. On the other hand, an incorrect response to a false identification may have serious consequences, such as human rights violations, financial and reputational damage, etc.
So, when dealing with the personal data in the database, make sure ethical AI principles are respected:
- IREX records a detailed log about adding persons to databases, running a search query by photo, and all other actionable items. The log is fully searchable and auditable, protecting both Law Enforcement & society.
- IREX detects pre-identified persons only to prevent a terror attack, find missing children or tackle other public safety threats. The number of persons that can be added to the database for real-time biometric identification is restricted.
- IREX data scientists and AI engineers are continuously working to reduce accuracy bias across multiple demographic groups.
Any management action with the person database requires a Case ID to be provided.
Manage Person Lists
Click the User Menu > Settings > Persons under Lists on the left-hand sidebar to open the list of existing person lists.
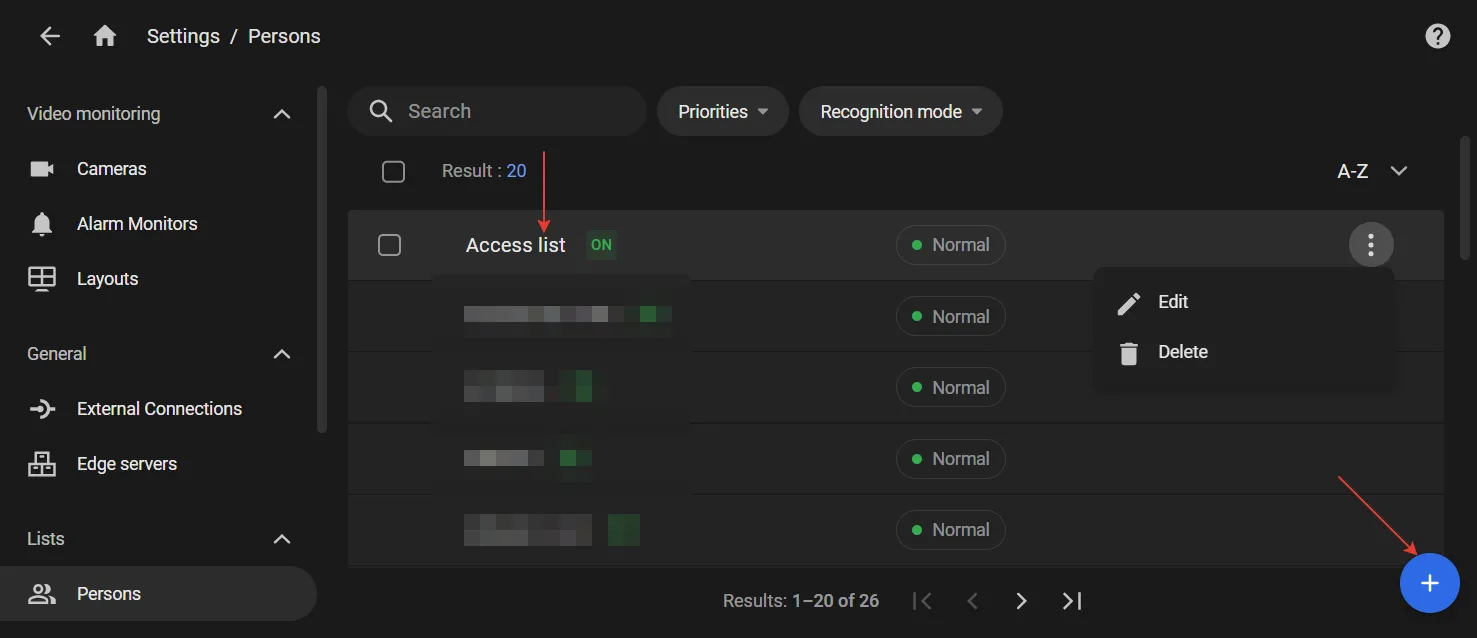
Click as the red arrow on the left shows to view the content of the list presented as an array of cards in much the same manner as the entire database content.
Click Edit in the three-dot menu on a list to edit the metadata of the list (name, etc.) in the window that opens. Here, Similarity is the threshold to recognize persons on the list. The scale range is 55% to 100%.
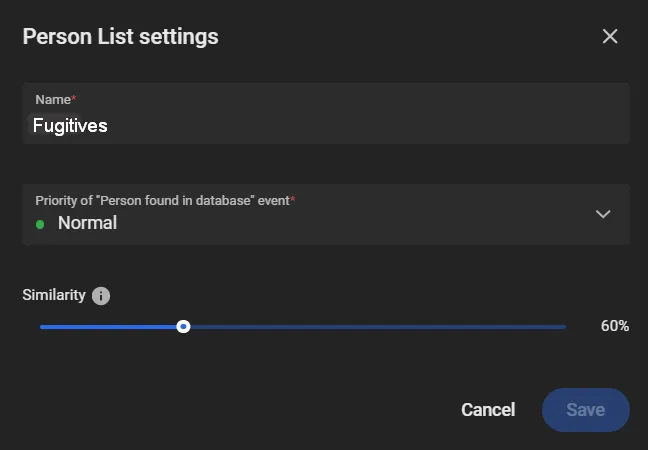
Click Delete in the same menu to delete the list.
Click a “+ sign in the bottom-right corner as shown to create a new person list.
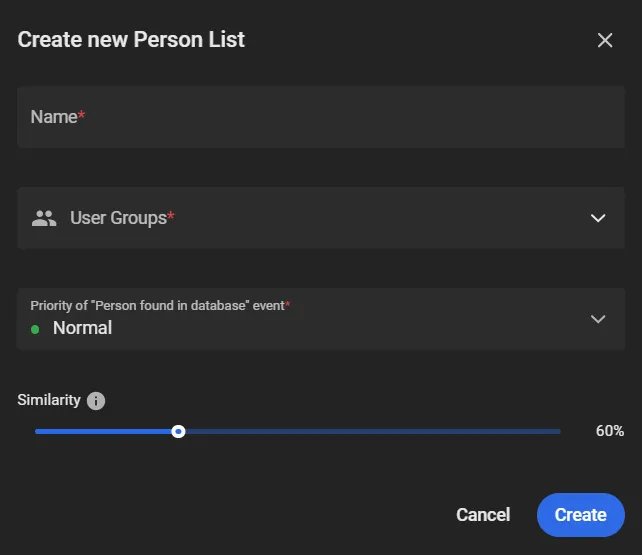
- Enter the new list name and priority of face recognition events for the list into the relevant fields.
- On the User group list, select the groups to share the list with.
- Set Similarity: the match percentage between a face detected by a camera and a photo of a person on this list. The platform records a Person found in database event when similarity is at least the selected value. The scale range is 55% to 100%.
Selection is limited to the groups the current user already belongs to.
How to grant wider access to a person list?
How to quickly find events with persons on the list?
Similarity value shall not be understood in terms of how visually similar persons are; it is rather a quantitative measure of distance between the abstract feature vectors. One may expect that, in general, the higher the value, the more similar the persons look. However, it is not necessarily true in each particular case.
Manage Personal Entries
To view more details about a person in the database (driver's license data, owned vehicles, etc.), click his or her photo on the card — a sidebar opens on the right holding those details.
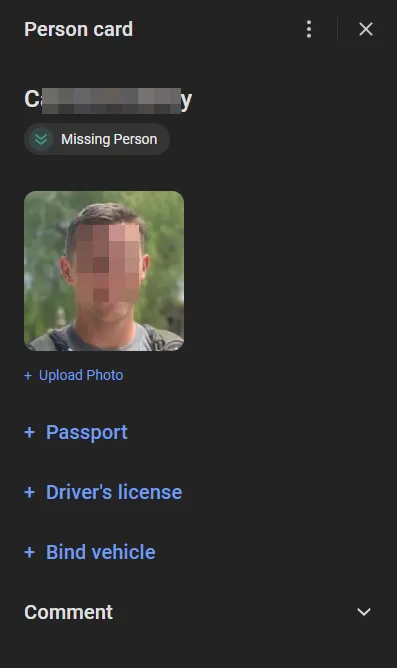
To delete a personal entry from a person list, click Delete in the three-dot menu on the card.
To edit personal data in a personal entry, click Edit in the same menu, then edit the personal data form that opens.
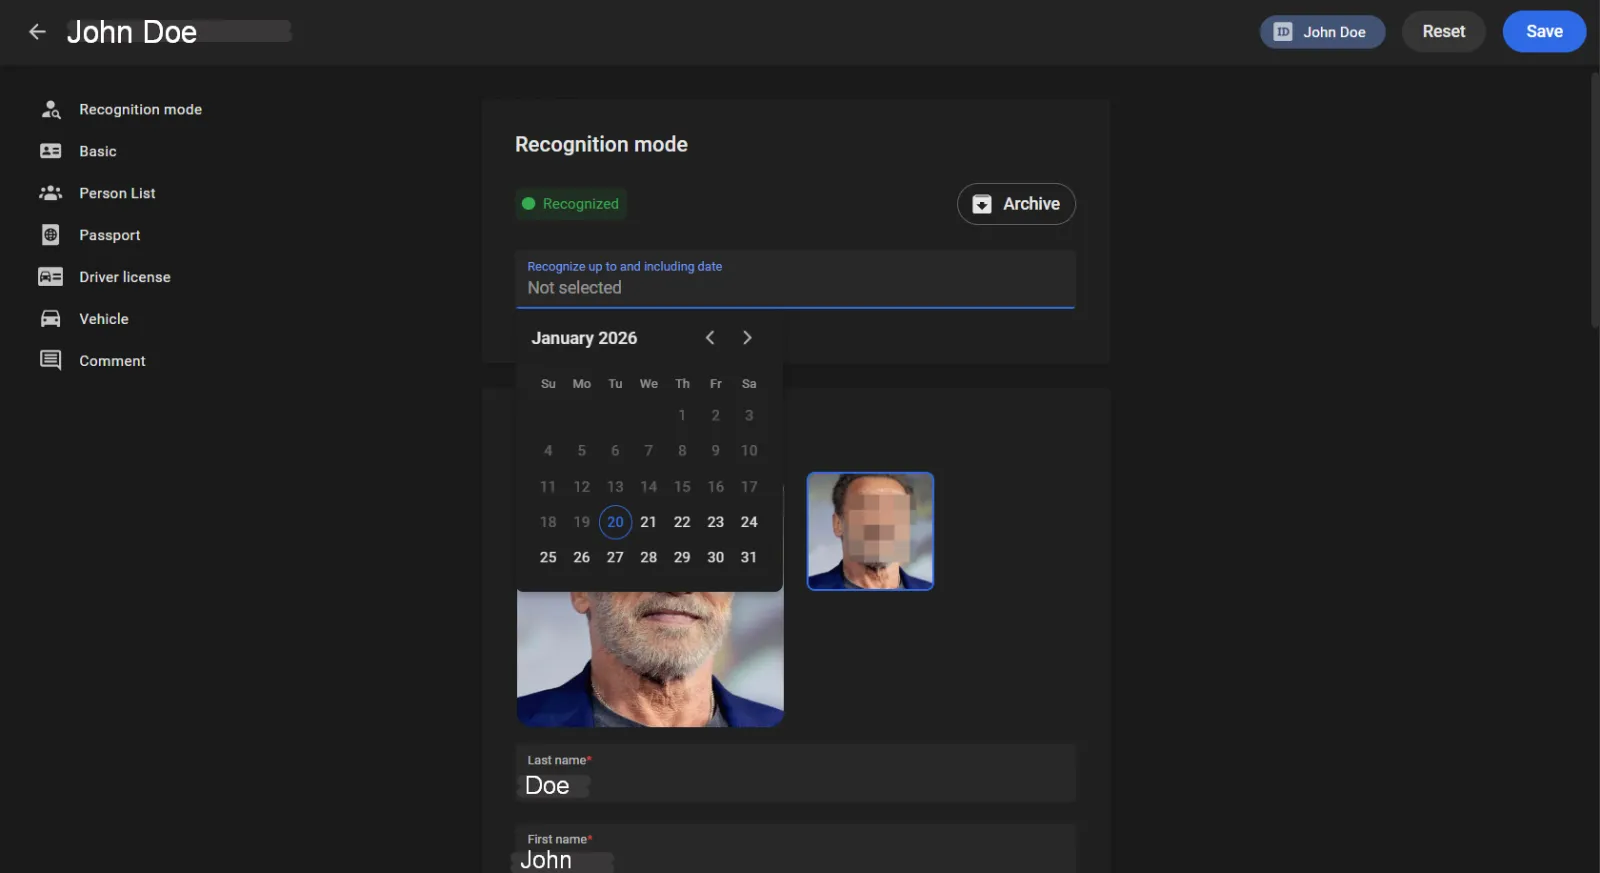
Here, click Recognize under Recognition mode to allow face recognition of the person and then set up a time window for this below. Click Archive to ban the face recognition.
To create a new entry on a list:
- Open the list page.
- Click "+" in the bottom-right corner.
- Complete the new personal entry form.
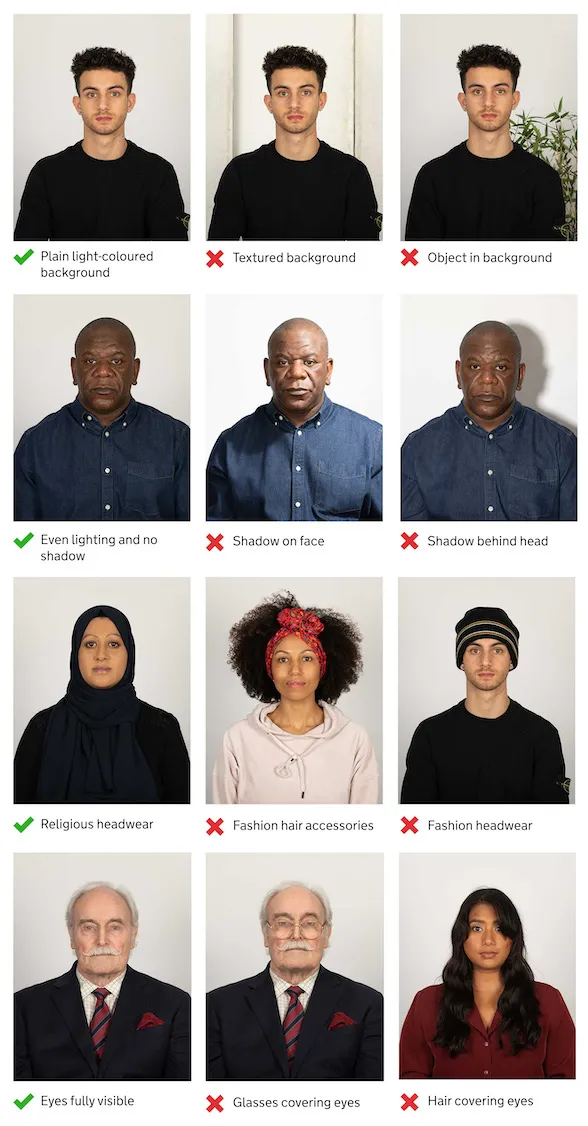
When uploading photos of the new person, keep in mind that the Platform video analytics performs best with enrollment photos that comply with ISO/IEC 19795-1 INTERNATIONAL STANDARD Requirements, illustrated below:
Find a Person's Entry
A Case ID is required !
If the array of personal entries in the database is massive enough, use a search technique to quickly find a person's card. It can be:
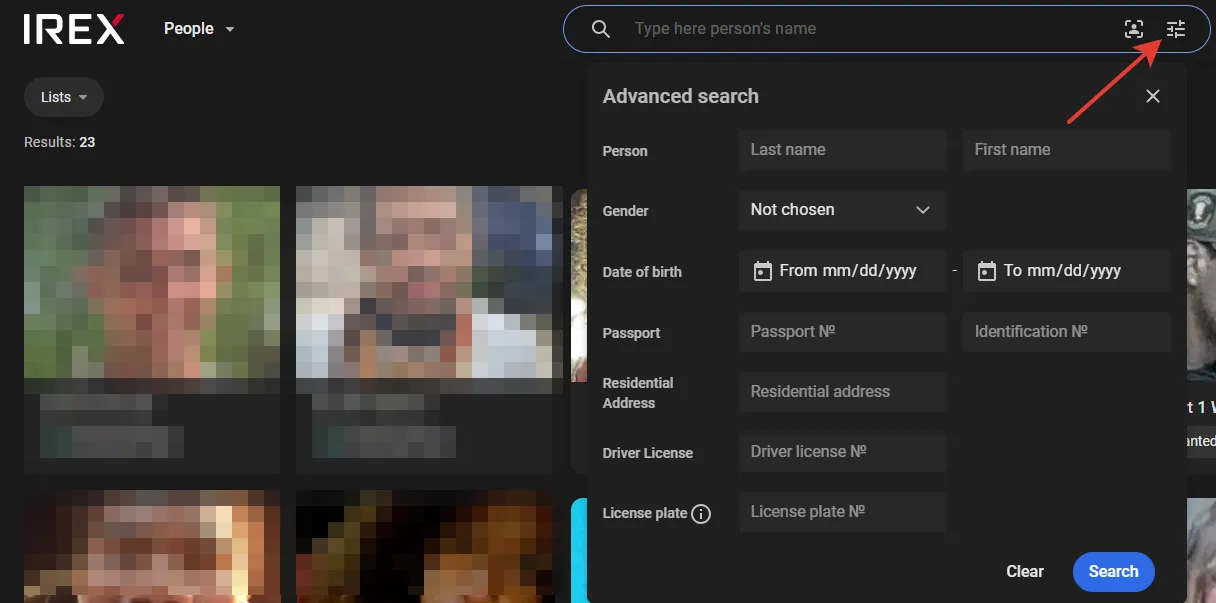
- Search by a text attribute, such as name, passport, or driver's license data, date of birth, etc.
- Search by photo or descriptor.
Find by a Text Attribute
To do so, click as shown in the search text box on the People screen to enter these search criteria into the advanced search form that opens, and click the Search.
Find by Photo or Descriptor
Do so on the People screen exactly in the same way as when searching for events with people.
Import of Personal Entries to a List from a TAR Archive
Personal entries can be imported into an existing person list from a TAR archive. The archive content may be either "poor" (type A) or "rich" (type B).
Import of a “Poor” Archive
A “poor” TAR archive contains only:
- Personal photos ...
- ... in JPG, JPEG or PNG formats ...
- ... named in the format “Lastname Firstname.jpg/jpeg/png” (e.g., “Doe John.png”).
- ... and nothing else.
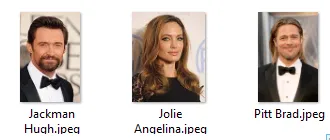
The import of an archive like this adds personal cards to the list, where:
- Name on the personal card is set to the "Firstname" in the file name.
- Last name is set to the "Lastname" from the file name.
- The photo comes from the corresponding “Lastname Firstname.jpg/jpeg/png” file.
- Other fields remain empty.
To import an archive like this:
- Open the list to import entries into.
- Click the Import on the three-dot menu (2) and navigate to the archive file in the standard Open window.
- Confirm the import:
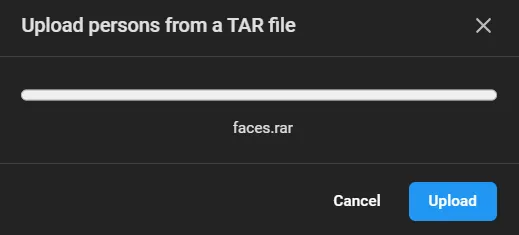
Then refresh the page to see the new entries have appeared on the list:
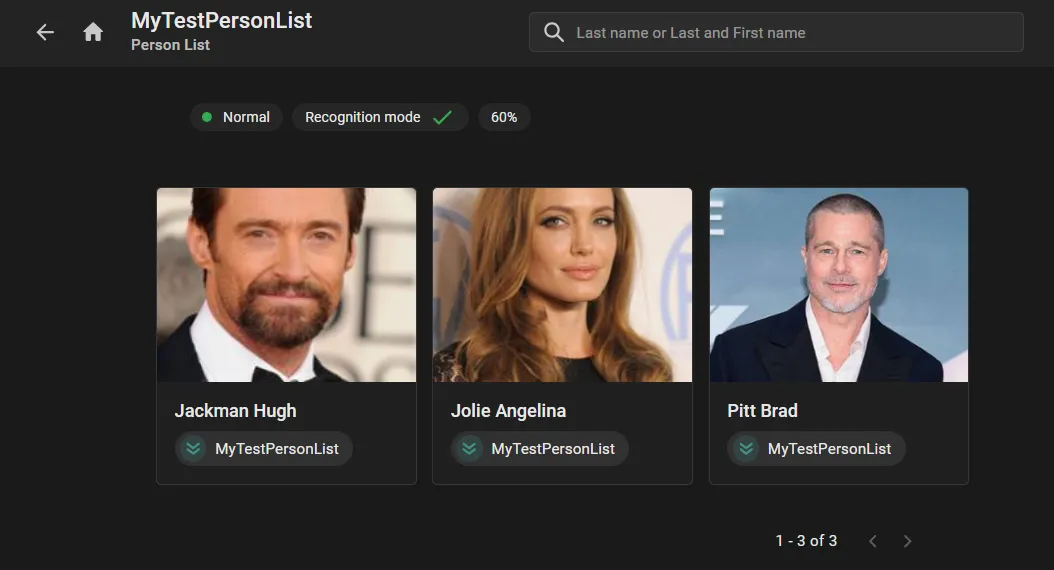
Import of a “Rich” Archive
In contrast to a "poor" archive, a "rich" one contains:
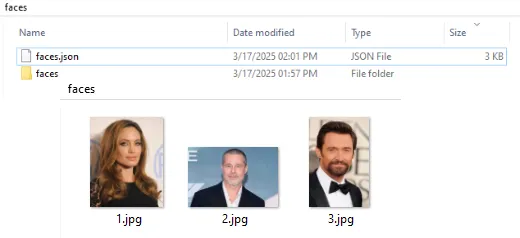
- faces subfolder containing personal photos with arbitrary filenames.
- faces.json file containing structured JSON descriptors with all available information about the individuals, for example:
[
{

  "first_name": "Angelina",  // First name
  "last_name": "Jolie",   // Last name
  "middle_name": "string", // Middle name
  "avatar": "faces/1.jpeg // Path to the avatar file in the faces folder. E.g. Jolie's photo is in the "1.jpeg" file
  "images": [{"image": "faces/1.jpg"}], // Path to the photo file in the faces folder
  "comment": "Vandalism reported at local park.", // Textual comments

  // More optional fields stand below, completed according to availability


  "driver_license_date_of_issue": "2024-03-26",  // Driver license issue date
  "driver_license_issued_by": "string",          // Driver license issyed by ...
  "driver_license_number": "string",             // Driver license number
  "driver_license_validity": "2024-03-26",       // Driver license expiration date
  "driver_license_categories": [                 // Driver license categories
    "string"
  ],
  "family_state": "N",  // Martial status
  "gender": "M",        // Gender M/F
  "passport_date_of_issue": "2024-03-26",  // Passport issue date
  "passport_identification_number": "string",  // Passport ID
  "passport_issued_by": "string",              // Passport issued by ...
  "passport_number": "string",                 // Passport number
  "passport_validity": "2024-03-26",           // Passport expiration date
  "registration_address": "string",            // Residential address
  "birthday": "2024-03-26",                    // Date of birth
  "birth_place": "string",                     // Place of birth
  "avatar_image_id": 0,
  "comment": "string",

  "plates": [ // Person's vehicle license plate numbers
    0
  ],
  "plates_count": 10, // Owned vehicle number
  "similarity": 0,    // Person recognition threshold
  "external_system_person_id": "string",  // Optional extra data
  "params": {
    "additionalProp1": {},
    "additionalProp2": {},
    "additionalProp3": {}
  },
  "type": "string",
  "permissions": [
    "CREATE_CHANNEL"
  ]
},

{
  "first_name": "Brad",  // First name
  "last_name": "Pitt",   // Last name
  ...
},
...
]
To import a "rich" archive:
- Ensure that the information in the faces.json file is as complete and well-structured as shown in the example above.
- Verify that the paths in the "avatar" and "images" fields correctly point to photo files in the faces folder.
- Open the list to import the archive into.
- Click the Import on the three-dot menu (2) and navigate to the archive file in the standard Open window.
- Confirm the import:
- Click Done, then refresh the page to view the newly added entries in the list.
- Chech that additional personal information (date of birth, driver's license number, etc.) taken from the faces.json file correctly displayed on the new person cards.
Export of a List to TAR Archive
The reverse process of import is exporting a list into a TAR archive containing:
- faces subfolder containing personal photos matching those on the personal cards, with filenames assigned automatically.
- JSON descriptors of the personal cards in faces.json file, in which entries are like this:
{

  "first_name": "string",  // First name
  "last_name": "string",   // Last name
  "avatar": "faces/facelist-131/face-763/7e65...8438.jpeg", // Path to the avatar file in the faces folder. Here "131" is the exported list ID, "763" is the person's ID.
  "images": [
    {
  "image": "faces/facelist-131/face-763/7e65...8438.jpeg"  // Path to the photo file in the faces folder. Here "131" is the exported list ID, "763" is the person's ID.
}
    ]

  // Optional fields go below, if available


  "middle_name": "string", // Middle name
  "driver_license_date_of_issue": "2024-03-26",  // Driver license issue date
  "driver_license_issued_by": "string",          // Driver license issued by ...
  "driver_license_number": "string",             // Driver license number
  "driver_license_validity": "2024-03-26",       // Driver license expiration date
  "driver_license_categories": [                 // Driver license categories
    "string"
  ],
  "family_state": "N",  // Martial status
  "gender": "M",        // Gender M/F
  "passport_date_of_issue": "2024-03-26",  // Passport issue date
  "passport_identification_number": "string",  // Passport ID
  "passport_issued_by": "string",              // Passport issued by ...
  "passport_number": "string",                 // Passport number
  "passport_validity": "2024-03-26",           // Passport expiration date
  "registration_address": "string",            // Residential address
  "birthday": "2024-03-26",                    // Date of birth
  "birth_place": "string",                     // Place of birth

  "comment": "string",

  "plates": [ // Person's vehicle license plate numbers
    0
  ],
  "plates_count": 10, // Owned vehicle number
  "similarity": 0,    // Person recognition threshold
  "external_system_person_id": "string",  // Optional extra data
  "params": {
    "additionalProp1": {},
    "additionalProp2": {},
    "additionalProp3": {}
  },
  "type": "string",
  "permissions": [
    "CREATE_CHANNEL"
  ]
}
To export a list to an archive like this:
- Click the Export on the three-dot menu ⋮ (2) — the archive to export will then be created and temporarily saved in the computer's memory.
- Click the Download export that appears on the same menu, and show the local directory to save the archive to in the standard Save as window.