
ObjectTrack Pro
Use ObjectTrack Pro for these scenarios:
- People on a rail track: monitor track maintenance and detect accidental or deliberate entry into restricted areas.
- Abandoned luggage: flag unattended bags and other items that may threaten public safety.
- Perimeter intrusion: detect people or vehicles entering a restricted area.
- Loitering: people staying too long in an area not meant for lingering.
- Off duty: people missing from a post where they must remain present.
- Right-of-way violations: pedestrian presence and direction on a crosswalk, used with CarTrack Pro on a road object.
ObjectTrack Pro Overview
How It Works
CNN-1, a convolutional neural network, recognizes objects of predefined classes in every nth frame of the incoming stream and builds a box around each one. Detected objects go to a correlation tracker, which follows them between those frames, and to CNN-2.
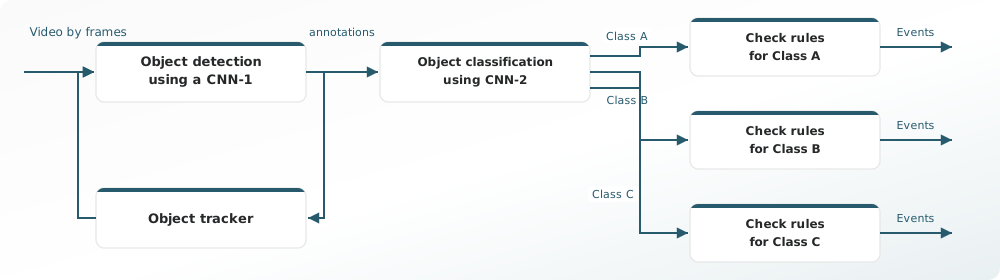
CNN-2 classifies the objects as people, vehicles, bags, or suitcases, then checks each class against its conditions. For example, a person is checked for the people on a rail track condition. When the conditions are met, the module creates the corresponding event. Other configured rules follow the same path, including a signal line crossed in the perimeter intrusion scenario.
Computational Complexity
The algorithm is rated 4 on a 5-point complexity scale. Average CPU usage is about 80%, and the load can vary with video resolution and the processor.
Tips
ObjectTrack Pro classifies specific object types, so it holds up better than MotionTrack Pro in poor outdoor conditions.
MotionTrack Pro can also cover perimeter security, loitering, and abandoned items. The table below compares how the two modules handle those tasks.
| MotionTrack Pro | ObjectTrack Pro |
|---|---|
| Analyzes pixel changes to detect motion of any object. The module can classify certain object types. | Classifies and tracks only certain object types. |
| False alarms are possible, because the module records motion of any objects (for example, branches or leaves). | Fewer false alarms, because the module records only certain object types. |
Works even with relatively low image quality. Minimum detected object area:
|
Requires high image quality. Minimum detected object area:
|
| Lower CPU usage. Average is about 60%. | Higher CPU usage. Average is about 80%. |
Camera Requirements
To select cameras, use specialized software (for example, IP Video System Design Tool) or a free lens calculator from the camera manufacturer.
| Characteristic | Requirement |
|---|---|
| CMOS sensor size | 1/3″ or larger |
| CMOS sensor light sensitivity | 0.01 lux or less for a color image with automatic gain control (AGC) on at 30 IRE; 0.05 lux or less for a black-and-white image with AGC on at 30 IRE |
| Electronic shutter speed | adjustable from 1/25 to 1/10,000 second, or a wider range |
| Electronic shutter speed adjustment modes | automatic / adjustment range / manual |
| Number of video streams | 2 or more |
| Primary stream resolution | 1280×720 to 2560×1920 pixels |
| Secondary stream resolution (optional, for layouts) | 320×240 to 704×576 pixels |
| Video frame rate | 10 to 25 frames per second |
| Lens focal length | 2.8 mm or longer |
| Primary stream bitrate | up to 8 Mbps |
| Secondary stream bitrate | up to 1 Mbps |
| Video encoding type | constant (CBR) / variable (VBR) |
| Video encoding protocol | H.264 HP/MP/BP, H.265 |
| Network protocol support | TCP/IP, ICMP, HTTP, HTTPS, RTP, RTSP, NTP, SNMP, IGMP, IPv4/IPv6 |
| Video transmission protocol | RTP over TCP |
| ONVIF compatibility (optional, for remote camera control) | ONVIF (PROFILE S, PROFILE G) |
| Built-in illumination | 20 meters or more |
Camera Mount Requirements
| Characteristic | Requirement |
|---|---|
| Camera tilt relative to the horizon | 0° to +75° (side view); 75° to 90° (top view) |
| Image quality at the border of the controlled zone | 50 pixels per meter or more |
| Recommended mounting height | 2.5 to 5 meters above floor or ground level |
| Illumination of the controlled zone | 50 lux or more across the camera scene |
Detect People on a Rail Track
This is a real-time scenario. A person on the tracks needs a fast response.
- Make sure the cameras used for track surveillance meet the system requirements.
- Set up ObjectTrack Pro on those cameras to detect people on a rail track.
- Build an alarm monitor with Cameras = those in item 1 and Analytics modules > ObjectTrack Pro > Motion in region selected.
- Enable notifications about new alarms on this monitor.
To configure the module:
- Enable the ObjectTrack Pro module.
-
On the module settings pane, set the Region of interest to the part of the frame where people on the tracks will be detected. The Region of interest defaults to the full frame.
- Drag a vertex to a new position while holding the left mouse button.
- Double-click a vertex with the left mouse button to delete it.
- Double-click an existing edge with the left mouse button to add a vertex.
- Click inside the region and drag it while holding the left mouse button to move the whole region.
-
In the Object tracking types block, turn on People and select one tracking mode:
- People tracking: when the camera tilt is less than 45°.
- People tracking (top view): when the camera tilt is more than 45°.
-
Add a Motion in region or Line crossing rule.
Settings for the Motion in region rule:
-
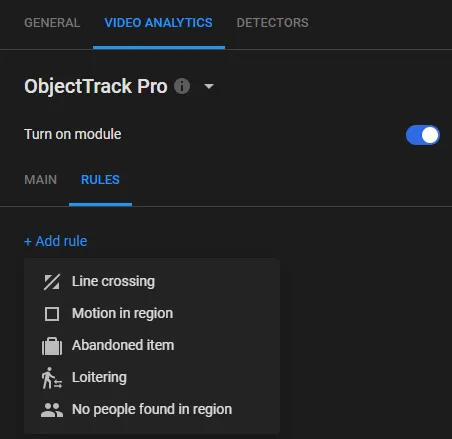
On the Rules tab, select Add rule > Motion in region.
-
On the Motion in region rule card, enter the Event Name.
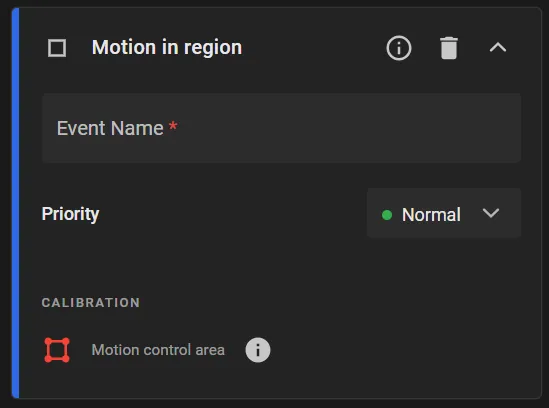
- Select the event Priority (Low, Normal, High, Critical).
- Set the Motion control area directly on the railway track.
- If object types other than People were selected in Object tracking types on the Main tab, the Motion in region card shows Filter objects by type. Set it to Humans so the module generates events only when people move.
Settings for the Line crossing rule:
-
On the Rules tab, select Add rule > Line crossing.
-
On the Line crossing rule card, enter the Event Name.
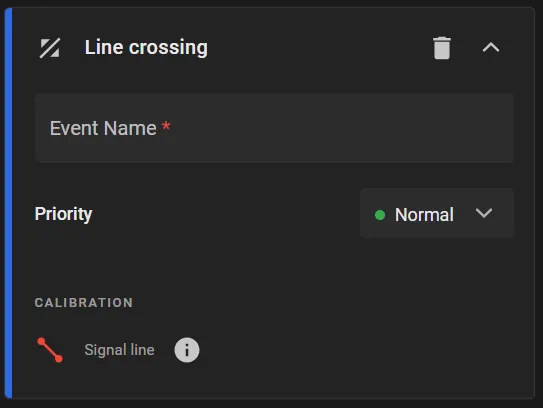
- Select the event Priority (Low, Normal, High, Critical).
- Draw the Signal line. The module generates an event when an object crosses it. Use the arrows on the line to set the crossing direction.
- If object types other than People were selected in Object tracking types on the Main tab, the Line crossing card shows Filter objects by type. Set it to Humans so the module generates events only when people cross the line.
-
On the Rules tab, select Add rule > Motion in region.
- Go to the Main tab and turn on Ignore people on trains so people inside a train do not trigger a person-on-track event. The option is available when People tracking is selected.
- In Object focal point, select the point used as the object's center. The module generates an event when that point crosses a line or the border of a region of interest.
- Click Apply.
Find Abandoned Luggage
Unattended bags, suitcases, and other items can be a serious threat at transit hubs and other public spaces. To get a real-time alert:
- Make sure the cameras covering those spaces meet the system requirements.
- Set up ObjectTrack Pro on those cameras to find unattended items.
- Build an alarm monitor with Cameras = those in item 1 and Analytics modules > ObjectTrack Pro > Abandoned item selected.
- Enable notifications about new alarms on this monitor.
To configure the module:
- Enable the ObjectTrack Pro module.
-
On the module settings pane, set the Region of interest to the part of the frame where abandoned items will be detected. The Region of interest defaults to the full frame.
- Drag a vertex to a new position while holding the left mouse button.
- Double-click a vertex with the left mouse button to delete it.
- Double-click an existing edge with the left mouse button to add a vertex.
- Click inside the region and drag it while holding the left mouse button to move the whole region.
- In the Object tracking types block, turn on Abandoned items and People. For People, select People tracking.
- Turn on Save abandoned items to store detected objects for later search in the archive (Advanced Search in the player).
- In Consider abandoned anew after … min, enter how many minutes must pass before the module can generate another abandoned-item event at the same place.
- Turn on Ignore bags closer than … so the module does not generate an abandoned-item event when a person is closer to the item than this distance: Bag filtration area enlargement factor × 100% × the bag bounding-box size.
- In Filter objects by size > Min and Max, set the minimum and maximum abandoned-item size as a percentage of the frame.
-
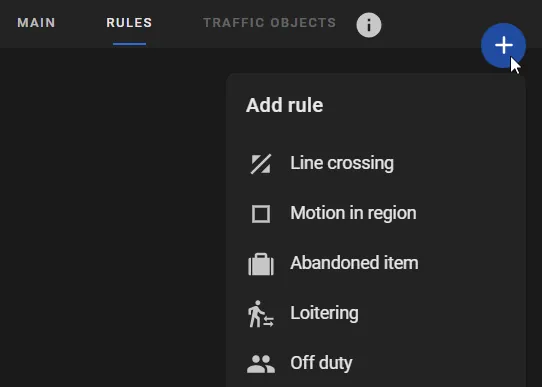
On the Rules tab, select Add rule > Abandoned item.
-
On the Abandoned item rule card, enter the Event Name.
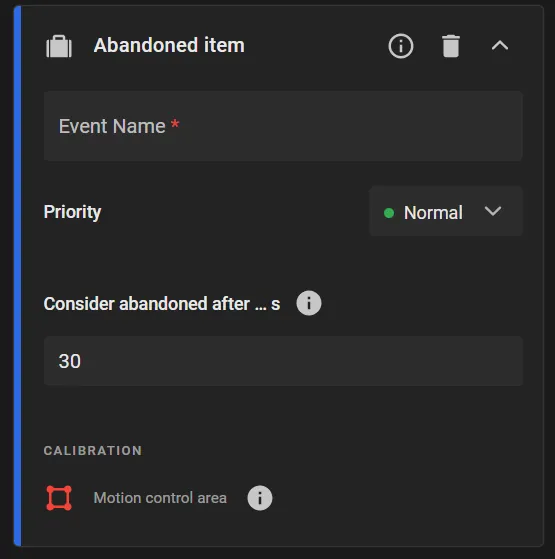
- Select the event Priority (Low, Normal, High, Critical).
- Set the Motion control area in the part of the frame where abandoned items are not allowed.
- In Consider abandoned after … s, enter how long an item must stay still in the control area before the module treats it as abandoned.
- Click Apply.
Detect Perimeter Intrusion
Use ObjectTrack Pro Line crossing and Region entrance events to detect people or vehicles entering a protected perimeter. The setup is similar to MotionTrack Pro. ObjectTrack Pro performs better because it classifies specific object types.
To configure the module:
- Enable the ObjectTrack Pro module.
-
On the module settings pane, set the Region of interest to the part of the frame where people and/or vehicles will be detected. The Region of interest defaults to the full frame.
- Drag a vertex to a new position while holding the left mouse button.
- Double-click a vertex with the left mouse button to delete it.
- Double-click an existing edge with the left mouse button to add a vertex.
- Click inside the region and drag it while holding the left mouse button to move the whole region.
-
In the Object tracking types block, turn on People and/or Vehicles.
For People, select a tracking mode:
- People tracking: when the camera tilt is less than 45°.
- Perimeter human detection: to capture people at a secured site, including during unusual movement such as crawling or rolling.
- People tracking (top view): when the camera tilt is more than 45°. When this mode is selected, the Vehicles type is unavailable.
- Turn on Region entrance to record when an object of a recognized type appears in the Region of interest, and assign a Priority to those events.
-
If events that include people need to be searchable by silhouette, turn on Detect human silhouettes.
The option is available when People is set to People tracking.
When this option is on, the module calculates silhouette descriptors for captured events. Operators can then search by silhouette.
-
Optionally turn on Recognize vehicle type and color. The option is available when Vehicles is on.
When this option is on, the module recognizes the following vehicle types:
- Motorcycle: any two-wheeled (or three-wheeled) motor vehicle: motorcycles, tricycles, scooters, mopeds.
- Car: sedan, hatchback, station wagon, coupe, SUV and crossover; vehicles intended to carry people, up to 8 seats.
- Light-duty truck: vehicles with payload up to 3.5 tons.
- Medium-duty truck: vehicles with payload from 3.5 to 12 tons.
- Heavy-duty truck: vehicles with payload over 12 tons.
- Tractor-trailer: a tractor unit with a semi-trailer, or a truck coupled with one or more trailers.
- Minivan: passenger vans and minivans: minibuses and vans for carrying passengers (up to 8 seats), including minivans and MPVs (multi-purpose vehicles).
- Bus: a vehicle for carrying more than 8 passengers. Includes city, intercity, and double-decker buses and trolleybuses.
- Machinery: wheeled and tracked agricultural or municipal tractors; specialized harvesting equipment; construction and road machinery: excavators, graders, asphalt pavers, truck cranes, loaders.
- Trailer: any trailer or semi-trailer standing apart from the tractor (for example, in a parking lot), or a passenger-car trailer.
The module does not detect color for Motorcycle.
- Turn on Save tracks to store motion trajectories of detected objects for later search in the archive (Advanced Search in the player).
- In Object focal point, select the point used as the object's center. The module generates an event when that point crosses a line or the border of a region of interest.
- Click Apply.
Additional Motion control area zones and Signal line crossings can be added inside the Region of interest. To add them:
-
On the Rules tab, select Add rule > Motion in region.
-
On the Motion in region rule card, enter the Event Name.
- Select the event Priority (Low, Normal, High, Critical).
- Set Filter objects by type so the module generates events only when the selected objects move.
- Set the Motion control area directly on the protected perimeter.
-
If the perimeter setup also needs line crossings, select Add rule > Line crossing.
-
On the Line crossing rule card, enter the Event Name.
- Select the event Priority (Low, Normal, High, Critical).
- Set Filter objects by type so the module generates events only when the selected objects cross the line.
- Draw the Signal line. The module generates an event when an object crosses it. Use the arrows on the line to set the crossing direction.
- Click Apply.
Detect Loitering
This is a real-time scenario. Loitering should be flagged quickly.
- Make sure the cameras covering the no-loitering zones meet the system requirements.
- Set up ObjectTrack Pro on those cameras to detect loitering.
- Build an alarm monitor with Cameras = those in item 1 and Analytics modules > ObjectTrack Pro > Loitering selected.
- Enable notifications about new alarms on this monitor.
To configure the module:
- Enable the ObjectTrack Pro module.
-
In the Object tracking types block, turn on People and select one tracking mode:
- People tracking: when the camera tilt is less than 45°.
- People tracking (top view): when the camera tilt is more than 45°.
-
On the Rules tab, select Add rule > Loitering. Use this rule to flag people who stay too long in an area not meant for lingering.
-
On the Loitering rule card, enter the Event Name.
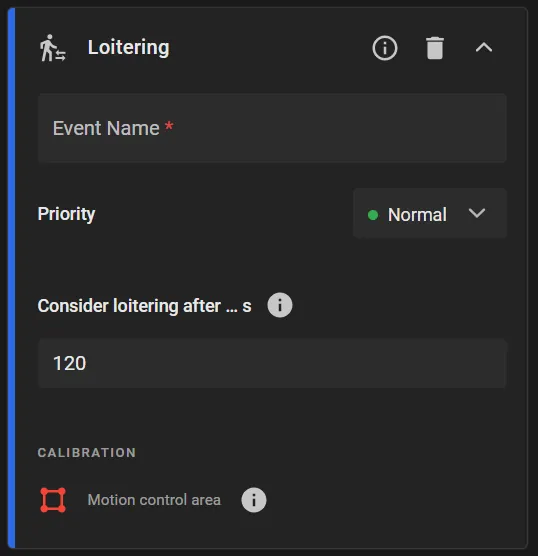
- Select the event Priority (Low, Normal, High, Critical).
- In Consider loitering after … s, enter how long a person may remain in the Motion control area before the module generates an event.
- Set the Motion control area where loitering is not allowed.
- Click Apply.
The Off-Duty Scenario
Use this scenario to confirm that staff remain at a post, for example, security officers at a checkpoint.
- Make sure the cameras covering the mandatory presence areas meet the system requirements.
- Set up ObjectTrack Pro on those cameras for the Off duty rule.
- Build an alarm monitor with Cameras = those in item 1 and Analytics modules > ObjectTrack Pro > Off duty selected.
- Enable notifications about new alarms on this monitor.
To configure the module:
- Enable the ObjectTrack Pro module.
-
In the Object tracking types block, turn on People and select one tracking mode:
- People tracking: when the camera tilt is less than 45°.
- People tracking (top view): when the camera tilt is more than 45°.
-
On the Rules tab, select Add rule > Off duty. Use this rule to confirm that assigned staff stay at their posts.
-
On the Off duty rule card, enter the Event Name.
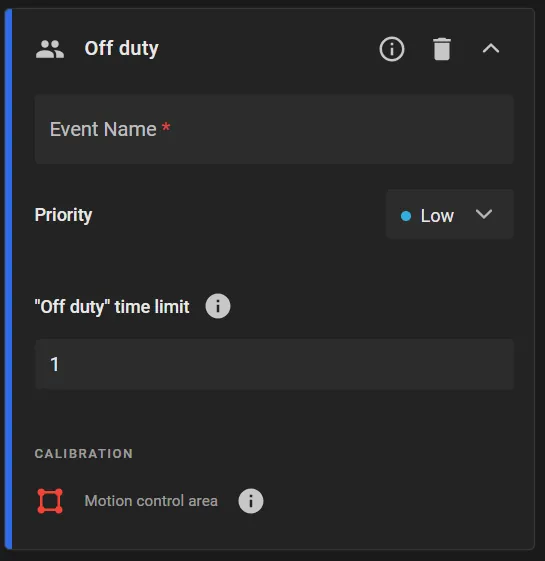
- Select the event Priority (Low, Normal, High, Critical).
- In "Off duty" time limit, enter the maximum time staff may be absent from the Motion control area, in minutes.
- Set the Motion control area where staff must remain.
- Click Apply.
Set Up Safety Gear Detection
Configure ObjectTrack Pro to detect helmets and safety vests on people at construction sites and other high-risk locations.
- Enable the ObjectTrack Pro module.
-
On the module settings pane, set the Region of interest to the part of the frame where safety gear will be detected. The Region of interest defaults to the full frame.
- Drag a vertex to a new position while holding the left mouse button.
- Double-click a vertex with the left mouse button to delete it.
- Double-click an existing edge with the left mouse button to add a vertex.
- Click inside the region and drag it while holding the left mouse button to move the whole region.
- In the Object tracking types block, turn on People and select Safety gear detection. The camera tilt must be less than 45°.
- Turn on Region entrance to record when an object appears in the Region of interest, and assign a Priority to that event.
- Click Apply.
When the module records a Region entrance event, the event details show safety-gear attributes: Helmet, No helmet, Vest, No vest.
The same safety-gear attributes appear on events from the Line crossing, Motion in region, and Loitering rules.
Those attributes appear in the event details when reviewing safety-rule events.
Set Up Right-of-Way Violations
ObjectTrack Pro detects pedestrians and their direction of travel in Crosswalk areas drawn in the module settings. Those detections feed right-of-way traffic violation rules.
- Enable the ObjectTrack Pro module.
-
On the Main tab of the module settings pane, set the Region of interest to the part of the frame where pedestrians will be detected. The Region of interest defaults to the full frame.
- Drag a vertex to a new position while holding the left mouse button.
- Double-click a vertex with the left mouse button to delete it.
- Double-click an existing edge with the left mouse button to add a vertex.
- Click inside the region and drag it while holding the left mouse button to move the whole region.
- In the Object tracking types block, turn on People and select Pedestrian tracking.
-
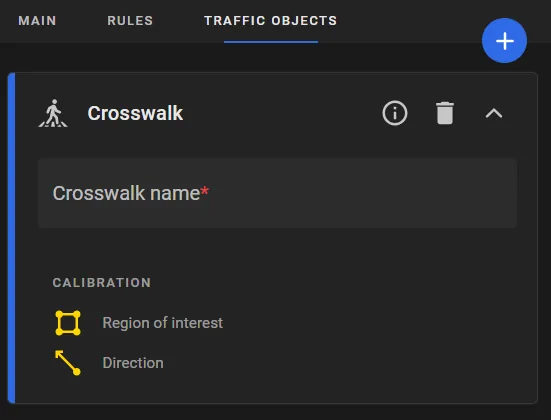
On the Traffic Objects tab, click Add traffic object > Crosswalk.
-
On the traffic object card, enter the Crosswalk name.
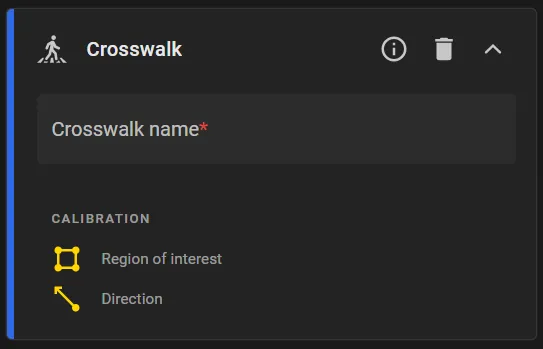
- On the player, draw a polygon for the Region of interest that matches the crosswalk or a segment of it.
- On the player, use the arrow to set the Direction of pedestrian travel on the crosswalk. When a violation rule is configured later, movement that matches the arrow is forward, and the opposite is backward. Pedestrian travel must stay within 60° of that direction (the limit can be changed in cluster settings). If the angle is greater than 60°, the movement does not match, and the platform does not record a violation.
- Click Apply.
Next, bind the cameras that have CarTrack Pro and ObjectTrack Pro turned on to the road object as cameras of type Pedestrians. Turn on control on the road object, then set the violation-control rules.
The platform records a Failure to yield to pedestrian violation, using the name set for that type, when a vehicle leaves the motion control area while a pedestrian is in the linked crosswalk region of interest and is moving in the arrow direction on the Crosswalk traffic object. Control must be on for the road object.