
MotionTrack Pro
MotionTrack Pro can be used in a wide variety of use cases, of which we consider the "Protect perimeter" and "No loitering" as examples below.
MotionTrack Pro in General
How It Works
A correlation detector processes the video and looks for any motion in the frame. When it finds motion, the moving object goes to a CNN, which builds the object box and classifies the object. A tracker then follows the object and checks the configured conditions, such as a crossed control line or presence in a control zone. When those conditions are met, the module creates the corresponding event.

Computational Complexity
The algorithm is rated 3 on a 5-point complexity scale. Average CPU usage is about 60%, and the load can vary with video resolution and the processor.
Camera Requirements
To select cameras, use specialized software (for example, IP Video System Design Tool) or a free lens calculator from the camera manufacturer.
| Characteristic | Requirement |
|---|---|
| CMOS sensor size | 1/3″ or larger |
| CMOS sensor light sensitivity | 0.01 lux or less for a color image with automatic gain control (AGC) on at 30 IRE; 0.05 lux or less for a black-and-white image with AGC on at 30 IRE |
| Electronic shutter speed | adjustable from 1/25 to 1/10,000 second, or a wider range |
| Electronic shutter speed adjustment modes | automatic / adjustment range / manual |
| Number of video streams | 2 or more |
| Primary stream resolution | 1280×720 to 2560×1920 pixels |
| Secondary stream resolution (optional, for layouts) | 320×240 to 704×576 pixels |
| Video frame rate | 10 to 25 frames per second |
| Lens focal length | 2.8 mm or longer |
| Primary stream bitrate | up to 8 Mbps |
| Secondary stream bitrate | up to 1 Mbps |
| Video encoding type | constant (CBR) / variable (VBR) |
| Video encoding protocol | H.264 HP/MP/BP, H.265 |
| Network protocol support | TCP/IP, ICMP, HTTP, HTTPS, RTP, RTSP, NTP, SNMP, IGMP, IPv4/IPv6 |
| Video transmission protocol | RTP over TCP |
| ONVIF compatibility (optional, for remote camera control) | ONVIF (PROFILE S, PROFILE G) |
| Built-in illumination | 20 meters or more |
Camera Mount Requirements
| Characteristic | Requirement |
|---|---|
| Camera tilt relative to the horizon | 0° to +75° |
| Image quality at the border of the controlled zone | 25 pixels per meter or more to detect motion; 50 pixels per meter or more to classify objects |
| Recommended mounting height | 2.5 to 5 meters above floor or ground level |
| Illumination of the controlled zone | 50 lux or more across the camera scene |
How to Protect a Perimeter
Perimeter protection can be a real-time use case. To make it simpler, we consider a perimeter intrusion as the crossing of a user-defined line, about which the user wants to be notified in real time using MotionTrack Pro.
- Consider the perimeter protection scheme (camera locations, environment, etc) keeping in mind the tips to use MotionTrack Pro.
- Enable the MotionTrack Pro module on the cameras tasked with the perimeter protection and set it up for advanced motion detection.
- Build the lines not to cross to set up line crossing.
- Build an alarm monitor with Cameras = those in item 2 and Analytics modules > MotionTrack Pro > Line crossing checkmarked.
- Enable notifications about new alarms on this monitor.
Intrusions into a protected perimeter can be the subject of a post-incident investigation as well. Then use the by-event name search, where "event name" is that given when setting up line crossing.
How to Detect Loitering
"No loitering" can be a real-time use case.
- Consider the "no loitering" surveillance scheme (camera locations, environment, etc) keeping in mind the tips to use MotionTrack Pro.
- Enable the MotionTrack Pro module on the cameras tasked with the "no loitering" surveillance and set it up for advanced motion detection.
- Build the "no loitering" area to set up loitering.
- Build an alarm monitor with Cameras = those in item 2 and Analytics modules > MotionTrack Pro > Loitering checkmarked.
- Enable notifications about new alarms on this monitor.
Tips to Use MotionTrack Pro
Unlike ObjectTrack Pro, MotionTrack Pro is insensitive to the type of moving objects, it only detects motion per ce.
Therefore, the module is recommended for use in a quiet indoor environment; outdoors it might generate an unacceptably high number of false alarms since there might be too many factors that cause false alarms being irrelevant to the subject of the surveillance.
On the other hand, for the same reason, the module can be considered more robust to spoofing attempts.
Set Up Advanced Motion Detection
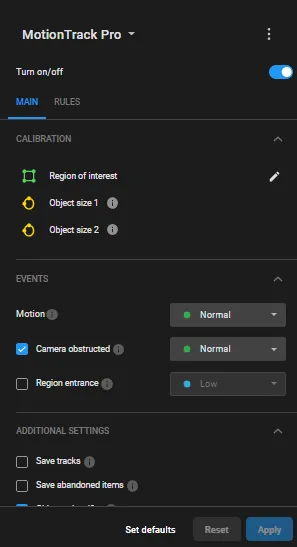
On the MAIN sub-tab define the parameters that the scenario needs under CALIBRATION and ADDITIONAL SETTINGS.
- Region of interest — the part of the frame to analyze; shown bordered in green. Defaults to the full frame.
- Object size 1, 2 - object size to recognize in the back- and foreground. Indicated with yellow ovals, dragged and dropped to edit.
- Save tracks - to save moving object tracks to the database to allow future searches for user-defined video fragments
- Object classifier - runs the calculations of the similarity degree between moving objects and humans or vehicles.
- Classify small objects - switches on to enable the advanced object classifier algorithm, applicable to objects as small as 256 pixels in size.
- Contrast sensitivity - the limit contrast value that allows an object to be distinguished on a background; an integer between 0 and 1.
- Motion sensitivity - the limit upon motion intensity to trigger the event; try different values to achieve the best result.
To move a vertex, point the cursor onto it and drag and drop it.
To delete a vertex, double-click it.
To add a vertex onto an edge, double-click where the vertex should be.
To move the region as a whole, place the cursor inside it and drag-and-drop.
To achieve more accurate calibration, the two ovals should be placed at the maximum distance from each other along the vertical axis.
Set Up Line Crossing
- Click the Add rule on the RULES tab to select Line crossing on the open menu.
- On the Line crossing rule card enter a custom name of the rule.
- Click the Signal line to draw the line not to cross.
- Switch on/off:
- Click the Apply.
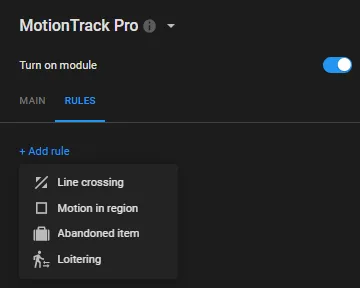
It makes sense to give a rule a self-explanatory and meaningfull name since it will be the event name that the users are meant to operate with. Rule names can be edited on the User Menu > Settings > Event Names screen.
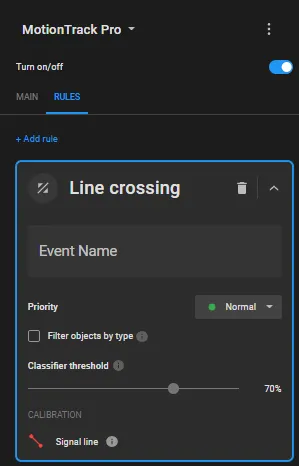
Filter objects by type - to classify objects triggering the event by type; effective only with the
Object classifier option switched on.
Classifier threshold - the limit upon object type recognition probability to trigger the "Line crossing" event.
Set Up Loitering
- On the rule menu, select "Loitering" to open the rule card:
- Enter a custom name of the rule (e.g., "Suspicious loitering").
- Click the No loitering zone to draw it.
- Enter the "Consider loitering" time limit in the text box of the same name.
- Switch on/off:
- Click the Apply.
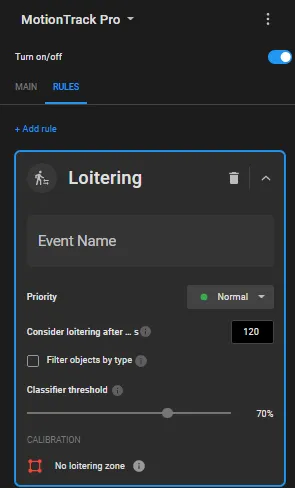
It makes sense to give a rule a self-explanatory and meaningfull name since it will be the event name that the users are meant to operate with. Rule names can be edited on the User Menu > Settings > Event Names screen.
Filter objects by type - to classify objects triggering the event by type; effective only with the
Object classifier option switched on.
Classifier threshold - the limit upon object type recognition probability to trigger the "Loitering" event.