
GunTrack
Use the GunTrack module to execute the "Detect weapon" scenario in public spaces such as schools, transport hubs, banks, and critical infrastructure, which is to detect in real-time different types of weapons pulled out or carried by bad actors. Like other real-time video analytics modules of the IREX Platform, GunTrack helps operators reduce the response time down to 1 sec and below in control rooms, real-time crime control, and fusion centers, thus increasing public safety and human rights protection.
GunTrack in General
How It Works
A convolutional neural network trained to recognize a gun checks every frame of the incoming video. When it finds a gun, it draws a box around it and produces a similarity score.
The module then checks the conditions set for the Gun detected event: similarity above the threshold, the object inside the monitoring zone, and others. When those conditions are met, the module creates a Gun detected event. The event goes to the event list and to the Alarm Monitor for that event.
Camera Requirements
To select cameras, use specialized software (for example, IP Video System Design Tool) or a free lens calculator from the camera manufacturer.
| Characteristic | Requirement |
|---|---|
| CMOS sensor size | 1/3″ or larger |
| CMOS sensor light sensitivity | 0.01 lux or less for a color image with automatic gain control (AGC) on at 30 IRE; 0.05 lux or less for a black-and-white image with AGC on at 30 IRE |
| Electronic shutter speed | adjustable from 1/25 to 1/10,000 second, or a wider range |
| Electronic shutter speed adjustment modes | automatic / adjustment range / manual |
| Number of video streams | 2 or more |
| Primary stream resolution | 1280×720 to 2560×1920 pixels |
| Secondary stream resolution (optional, for layouts) | 320×240 to 704×576 pixels |
| Video frame rate | 10 to 25 frames per second |
| Focus adjustment modes | automatic / semi-automatic / manual |
| Lens focal length | 4 mm or longer |
| Primary stream bitrate | up to 8 Mbps |
| Secondary stream bitrate | up to 1 Mbps |
| Video encoding type | constant (CBR) / variable (VBR) |
| Video encoding protocol | H.264 HP/MP/BP, H.265 |
| Network protocol support | TCP/IP, ICMP, HTTP, HTTPS, RTP, RTSP, NTP, SNMP, IGMP, IPv4/IPv6 |
| Video transmission protocol | RTP over TCP |
| ONVIF compatibility (optional, for remote camera control) | ONVIF (PROFILE S, PROFILE G) |
| Built-in illumination | 20 meters or more |
Camera Mount Requirements
| Characteristic | Requirement |
|---|---|
| Camera tilt relative to the horizon | 0° to +75° |
| Image quality at the border of the controlled zone | 150 pixels per meter or more |
| Recommended mounting height | 2.5 to 4 meters above ground level |
| Illumination of the controlled zone | 50 lux or more across the camera scene |
How to Get Alerted on Guns
- Think over the gun monitoring scheme as for the camera locations, cross-monitoring, view directions and zooms and other factors.
- Enable the GunTrack module on those cameras and set it up for gun detection with "Critical" priority assigned to the Gun detected event.
-
Build an alarm monitor having Analytics modules > GunTrack > Gun detectioncheckmarked.
Set Up Gun Detection
On the module settings pane that opens, do:
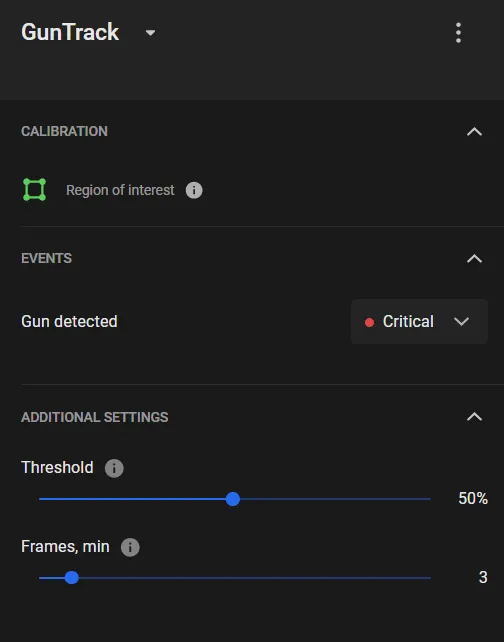
- Edit the Region of interest,which defaults to the full frame.
- Move the Threshold slider to define a gun similarity threshold to trigger the Gun detected event.
- Move the Frames slider to define the number of frames in a row to trigger the Gun detected event.
- Depending on the system hardware configuration at the user's end, an extra option can be offered to run the calculations on GPU. Switching it on significantly speeds up the module performance.
- Click the Apply to start streaming the “Gun detected” events onto the Events screen.
To move a vertex, point the cursor onto the vertex and drag and drop it.
To delete a vertex, double-click it.
To add a vertex onto an edge, double-click where the vertex should be.
To move the region as a whole, place the cursor inside it and drag-and-drop.
Select a value with account for the module performance stats, which depends on the typical, expected gun image size as viewed by the camera; values too high may lead to too many misses.
The similarity score must be exceeded in all these frames.
Tips to Use GunTrack
- GunTrack performance is critical to the expected gun image size, so pay close attention to finding a good location for the camera, which is the one that ensures the right balance between the surveyed area and gun image sizes.
- Consider cross-monitoring of critical sub-areas by several cameras at various zooms and other event verification measures; thoroughly think over the response protocols to a "Gun detected" alarm.